
After emerging during the Magic Online Championship Monthly Qualifier,
white aggressive decks, most splashing red for Heroic Reinforcements and/or
sideboard cards went on to dominate the Pro Tour last weekend, which, for a
person who has been glowing over the cards History of Benalia, Conclave
Tribunal, and Venerated Loxodon for months now, was great to see.
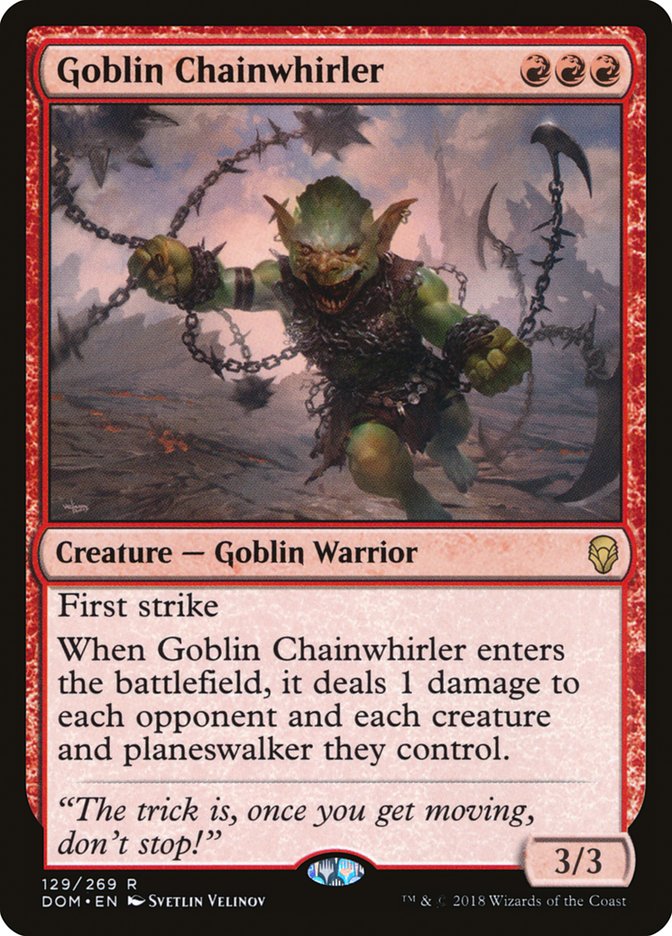
When
The
Chainwhirler
is away, the X/1s will play.
It may not have come via the Selesnya Conclave I have likewise championed,
but it’s clear that the tokens are still quite viable, along with Mono-Red
Aggro, Jeskai Control, Golgari Midrange, and Izzet Drakes. But the Boros
Aggro decks are the relatively new kid on the block, and the rush to
understand how to combat them or adapt to being the new bogeyman, depending
on your prerogative, is on.
What I want to focus on today, is the mirror match. The Pro Tour top 8 was
filled with them, and while that did lead to some fast games, those games
were filled with small, tactical decisions as both players jockeyed for
position, trying to maximize their own attacks while minimizing their
opponent’s.
The man who emerged victorious from this combat-centric top 8, Andrew
Elenbogen, made an interesting point in his winner’s interview, which you
can view here:
Watch Pro Tour Guilds of
Ravnica End Step: Final from Magic on www.twitch.tv
Andrew’s remark here is critically insightful, and if you go back and watch
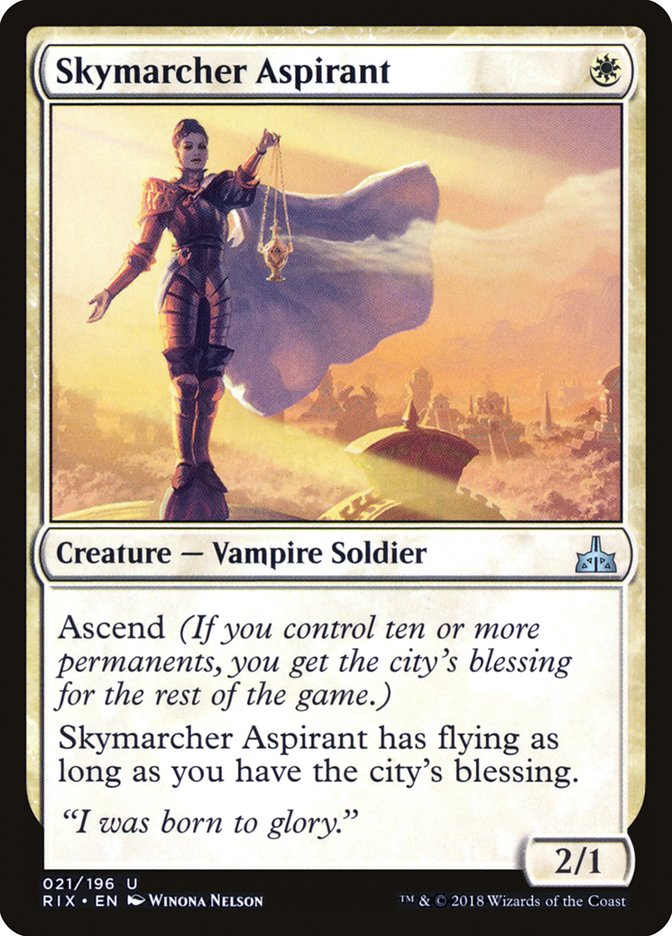
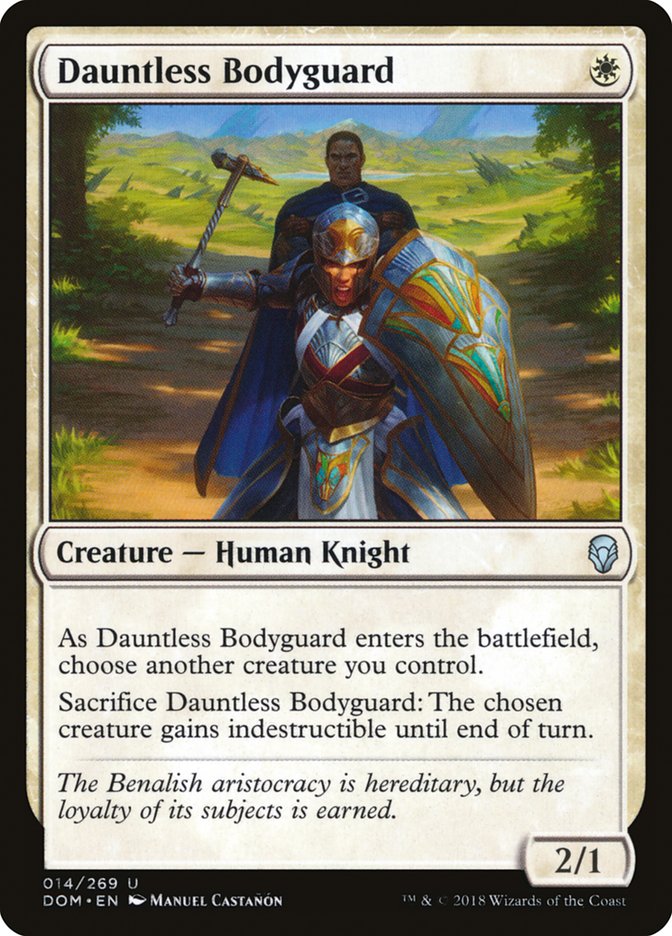
the various white mirrors, you’ll see instances where the players are
willing to trade say, a Skymarcher Aspirant for a Dauntless Bodyguard, and
times when they aren’t. The decisions of whether or not to trade in defense
or offer a trade on offense were important in every game and dictated how
they played out.
For inexperienced players, the question of whether to trade one card for
another often comes down to a simplistic evaluation of which card is better
in the abstract. In that model, trading a Dauntless Bodyguard for a token
from History of Benalia would be bad because they’re trading a full card
for half a card, while trading that same Dauntless Bodyguard for a Ajani’s
Pridemate is good because the latter is a more powerful card. This line of
thinking is a useful guideline, but is overly simplistic, as there are many
more variables at play in the decision since a card’s value is always
contextual to the gamestate.
Today, I’ll be unpacking this question in a general sense and looking at
the specific factors that go into answering it within the context of the
Boros Aggro mirror. One thing to keep in mind while reading is that this is
a dynamic question, that is one whose answer can change as the game
progresses, often multiple times, so you can’t answer it on turn 3 and move
on. Answering it each turn as the game changes is challenging, but a
surefire way to gain an edge in this mirror, as well as aggro mirrors in
general.
The Basics
At its heart, the decision of whether or not to trade is an exercise in
role-assessment. Trading resources is likely to force the game to go
longer, which makes sense if you’re trying to take a controlling role.
Conversely, taking an aggressive posture will require finding the attacks
that make trading as bad as possible for the opponent.
But when both players are playing similar decks with lots of overlapping
cards, and those cards are meant to be hyper-aggressive in the abstract,
it’s unclear which player should be more controlling from the start. The
first variable is who is on the play versus the draw. When your creatures
naturally want to be attacking, getting to attack first is the tiebreaker.
As long as both players are maintaining parity, the player going first will
want to press their advantage as much as possible while the player on the
draw will want to bide their time and be more apt to trade until they can
leverage their extra card to gain a clear advantage on the battlefield.
However, that qualifier, “as long as both players are maintaining parity”
is hugely significant. It doesn’t take long for a player to take a huge
advantage if their opponent stumbles, whether from missing a land drop, not
using all their mana, or failing to have an answer to a powerful card like
Benalish Marshal. As soon as one player gains an advantage on the
battlefield, whether on the play or draw, they become the aggressor.
to trade is an exercise in role assessment.
To this end, it’s important to evaluate how strong your hand is over the
first three to four turns of the game and judge whether or not you’re
likely to have the advantage at that time, with the play/draw variable
serving as a tiebreaker if you think both draws will be roughly even in
quality.
The last factor to consider here is who has the deck advantage in the early
game vs the late game. A list that goes bigger with cards like Aurelia,
Exemplar of Justice, Experimental Frenzy, and Lyra Dawnbringer is going to
want to draw out the game and leverage the power of those cards, while a
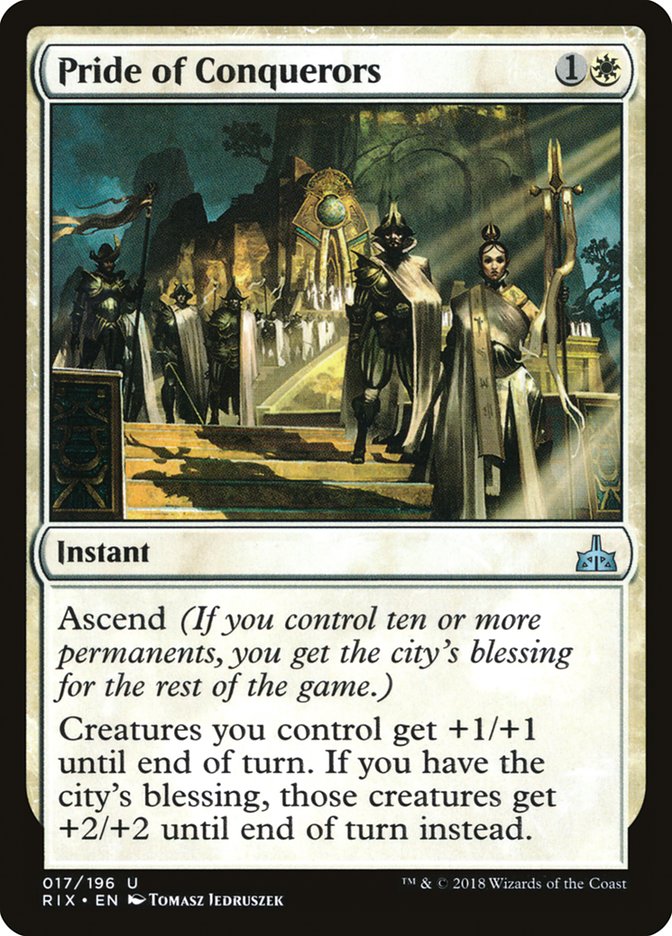
deck with more cheap creatures and finishers like Pride of the Conquerors
and Heroic Reinforcements will want to keep the battlefields large to make
those cards more impactful.
Evaluating this variable requires a fair amount of homework, researching
what different lists look like so you can make more reliable judgments from
the cards your opponents play early, but as the game goes longer, you’ll
want to keep track of what powerful cards have been played so you can
reasonably judge whose deck is more dense with powerful cards since it’s
that person who will be advantaged if the game progresses further.
The Specifics
Of course, these guiding principles are always going to be just that, a
guide. The cards themselves are the ultimate governors of the matchup, and
as we saw at the Pro Tour, understanding how to leverage them in accordance
with these principles is the key to the mirror.
The individual creatures are mostly interchangeable, though we’ll get to
the most important ones later on. Here I’ll be focused on three categories
of cards that every Boros Aggro deck was playing in some numbers: anthem
effects, the armies in a can, and the one-shots.

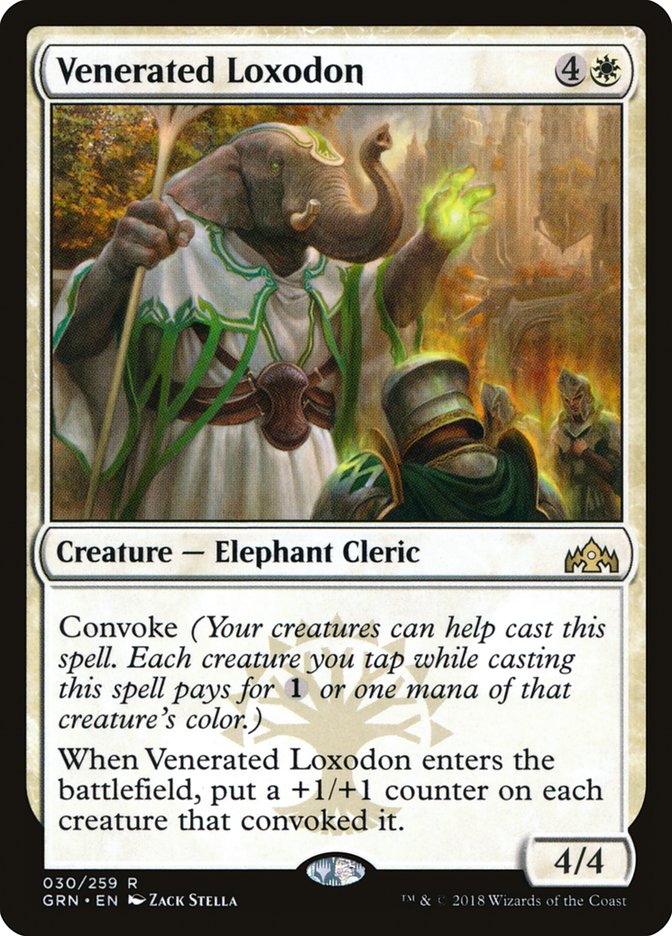
These are the primary anthem effects, by which I mean permanent buffs to
your creatures. They are the most important cards in the matchup because
the player with the larger creatures is going to dominate combat and thus,
win most games.
The obvious answer is that because they pump all your creatures, that you
won’t want to trade early so that their effect will be maximized. This
tactical pull is even stronger for Venerated Loxodon since each creature up
to the fifth makes it potentially cheaper to cast.
However, each of these creatures takes a significant cost to cast, with
Benalish Marshal often taking an entire turn of mana and Venerated Loxodon
requiring both mana and taking several creatures out of combat for a full
turn cycle. If cast haphazardly, you may open a window for your opponent to
make a large attack and either leave you unable to stave off death or
forced to leave your army back and give your opponent time to draw anthem
effects of their own to level the battlefield. If you’re dead or your
creatures can’t effectively attack, it doesn’t much matter how much larger
they are than your opponent’s.
With Venerated Loxodon, you’ll want to consider how many creatures you need
to leave untapped to play defense, knowing that once you untap you’ll be
quite far ahead, and any creature you would leave untapped anyway can be
traded off early without any loss. That trade can even be beneficial by
cutting off the potential for your opponent to double-block your larger
creatures, so be sure to trade off for higher toughness creatures if
possible – a Knight token is more valuable than a Skymarcher Aspirant here,
for example.
With Benalish Marshal, the consideration becomes the loss of tempo against
a removal spell removing the buff. If you try to slam a Marshal on turn
three and attack, you could be immediately put on the back foot while
unprepared to play defense and if that potentiality is dangerous enough,
it’s worth making an early trade or two knowing that you can press your
advantage with Benalish Marshal a turn or two later.
In essence, what you’re doing here is evaluating the diminishing returns of
your next pumped creature or two against the potential for your opponent to
go for a quick kill, knowing that your anthem advantage will quickly
snowball. The more behind you are when casting the anthem will be the
determining factor. The more behind you are, the more opportunity your
opponent has to capitalize on their window to put you at a precarious life
total, so the key here is to try to keep the battlefield relatively stable,
so that the anthem effects do maximum damage at minimum risk.
These are the army in a can cards. They both provide multiple bodies in one
card and as a result, are generally amenable to trading. Card advantage is
perhaps the oldest principle in Magic and making multiple bodies that can
each trade for one card from your opponent is a classic example of it in
action. Combined with other trading and you can run your opponent
completely out of threats and clean up the game with whatever’s left when
the dust settles.
But both of these cards have aspects of them that encourage keeping
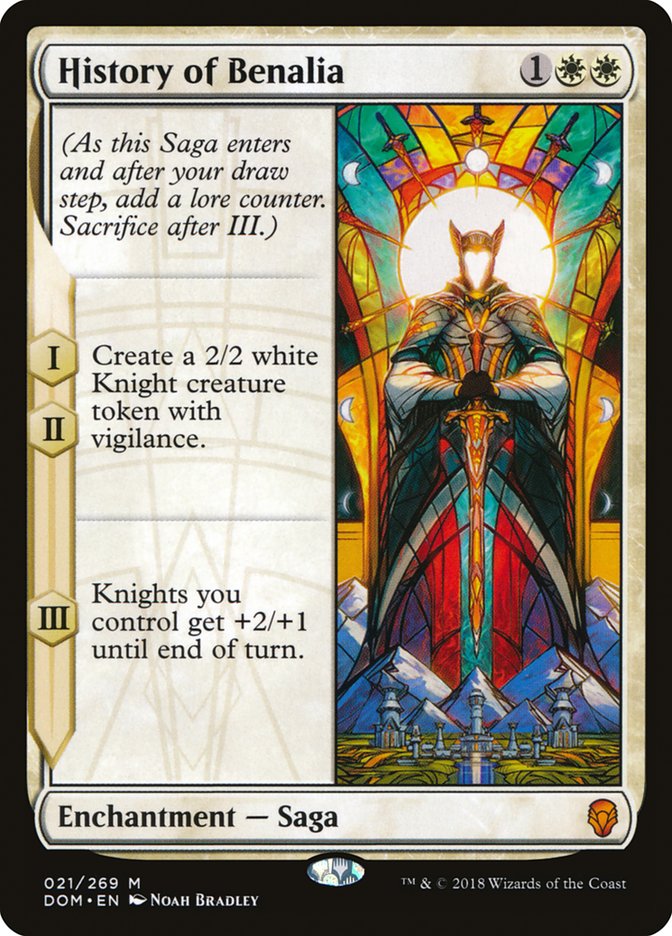
creatures on the battlefield. For History of Benalia, it’s the third
chapter providing a potentially devastating attack. The 4/3 Knight tokens
are difficult to block effectively and can lead to an even better trade
down the line should your opponent’s life total be low enough. This set up
is even more powerful if you have the “combo” of History of Benalia and a
second copy of History of Benalia for the back to back big attack.
With any kind of token maker like History of Benalia, the instinct is to
trade off those tokens because they are only half of a card, but on the
battlefield, a 2/2 vigilance Knight is often better than any one-drop
because vigilance lets you play offense and defense simultaneously, and the
second point of toughness means Knight tokens accept anthems more
effectively. So if you are trading, I’d look to trade the smaller creatures
rather than the tokens that are generally more effective on their own and
going to have at least one turn of attacking for two more damage.
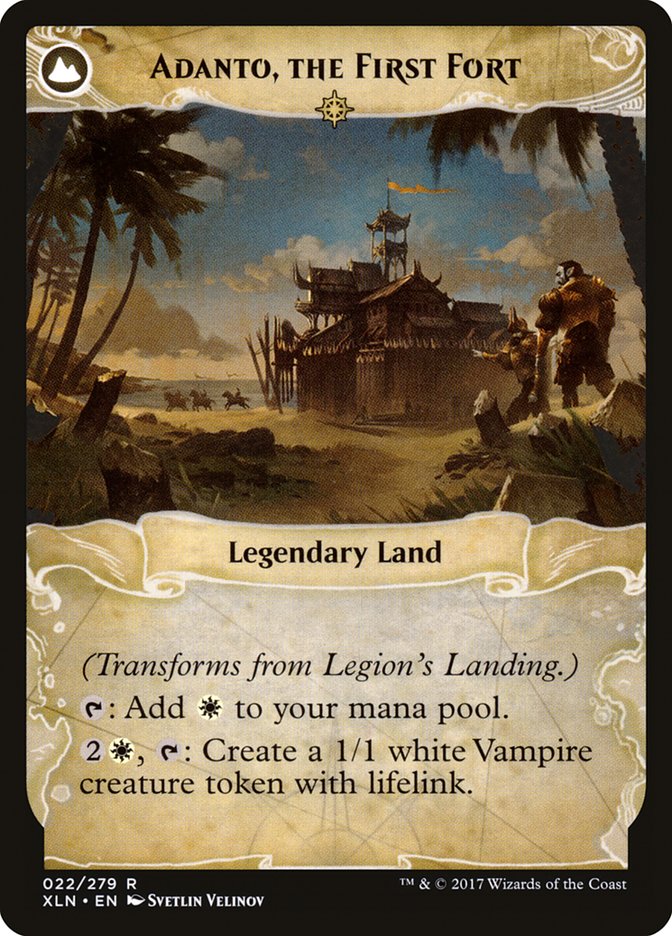
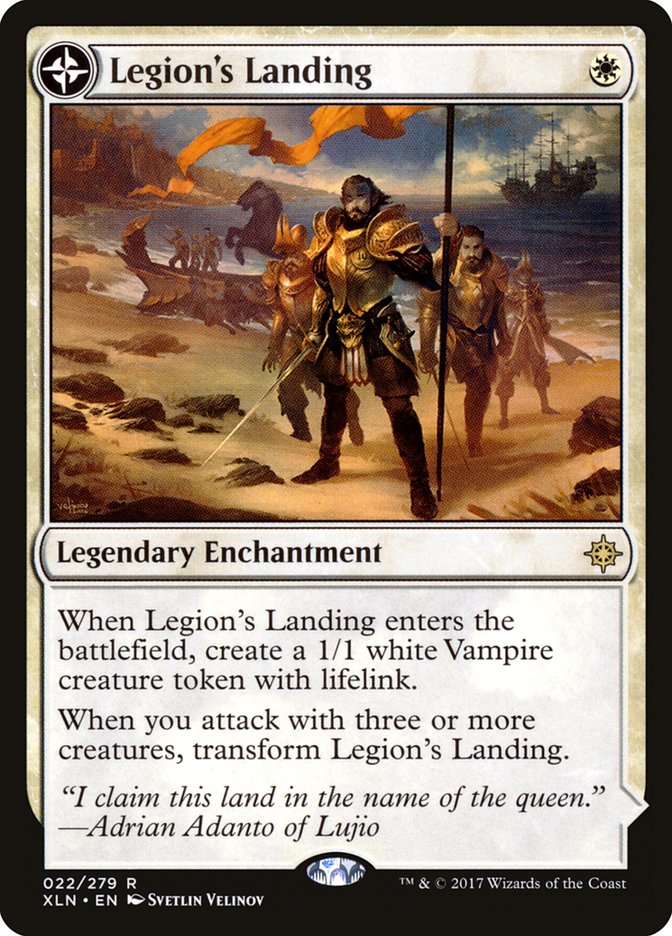
With Legion’s Landing, the impetus to trade creatures doesn’t actually come
until Adanto, the First Fort is online, which means attacking with three
creatures to transform it. This often means not trading too early, and in
some cases throwing away the Vampire token, which is a detriment to any
attrition plan. In practice, a key aspect to the card is the ability to
generate an extra land in the early game, thus providing a significant
tempo advantage that you can press by becoming the aggressor.
It’s not until the game goes rather long, many creatures have traded, and
you have mana to spare that the token generation comes into play, and in
these mirrors, it’s the early game that’s more important. So rather than a
lategame, attrition card, I’d be apt to view Legion’s Landing as a 1/1 +
Rampant Growth, which is a decidedly aggressive card that will
disincentivize trading in the early game outside of the turn you transform
it.
Lastly, both of these cards serve as important enablers for the ascend
mechanic. Skymarcher Aspirant is ubiquitous, and many lists play Snubhorn
Sentry as one of their many one-drops, and both creatures are very powerful
with the city’s blessing. Declining a trade to get to ten permanents could
pay significant dividends later on in the game and is something you should
be aware of when making these decisions.
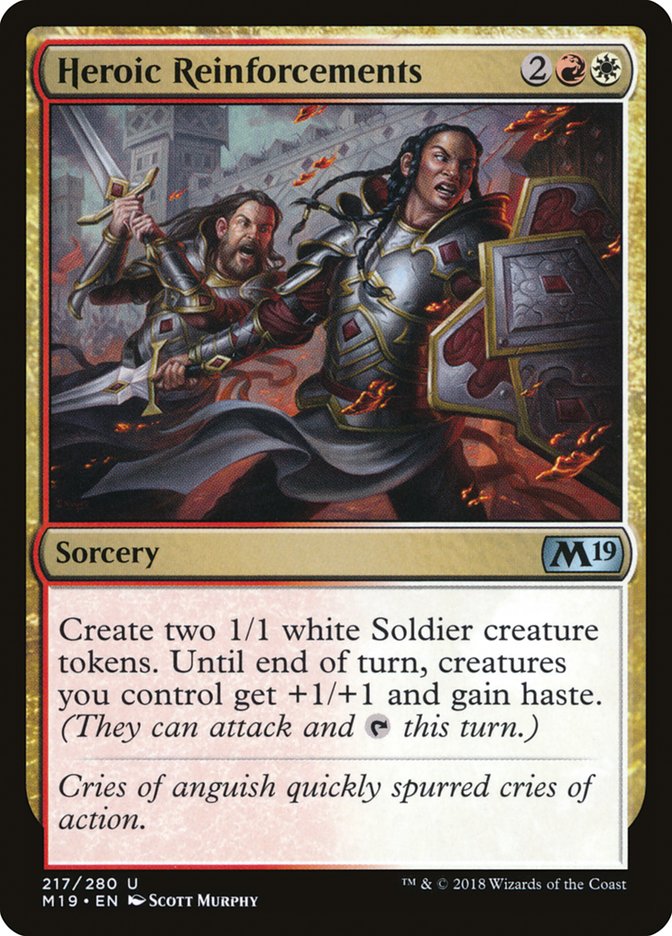
And finally, the one-shot effects. Much like the anthem effects, these are
most effective when the battlefield is clogged with creatures. With enough
attackers, they can threaten lethal damage quite early on and force the
opponent to take a more defensive posture than they would’ve liked or force
them into a bunch of bad blocks, devastating their position.
But unlike the anthem effects, the fact that these stop at the end of the
turn makes them ineffective on defense. In fact, the ability to threaten
these effects is one of the reasons why the aggressive player doesn’t want
to trade early.
But, as one player falls far enough behind, stealing a game with a single
big attack becomes the only viable path to victory. Trying to extend the
game via trading will only delay the inevitable once the advantage on the
battlefield is large enough, so trading becomes disadvantageous even for
the defensive player. At this point, you enter a subgame where the
attacking player wants to attack in such a way to maximize their clock
without leaving themselves dead to a topdeck.
You can see this subgame in action during
game four of the semifinal match between Jeremy Dezani and Luis
Scott-Vargas
. Falling behind early while on the draw, LSV stabilizes behind the power
of Benalish Marshal and Healer’s Hawk undoing much of Dezani’s damage
output. At that point, Dezani is behind on the battlefield and without an
answer to the fliers, so his best chance is setting up one large attack.
LSV recognizes this, stops attacking with anything but the Hawks, even
though Dezani’s blocks wouldn’t have been favorable. With the added
blockers, neither Pride of Conquerors nor Heroic Reinforcements would’ve
ended the game. A weaker player may have gotten too aggressive and given
Dezani a window to steal it.
The Best Defense is a Good Offense
I mentioned above that the creatures are mostly interchangeable, with some
exceptions. Those exceptions are any creature with one or more of the
following keywords:
- Vigilance
- Flying
- Lifelink
These abilities allow a creature to play offense unabated or play offense
and defense simultaneously, both of which are highly advantageous. The
common thread in everything discussed here is optionality – that is keeping
your options open while simultaneously limiting your opponent’s. With a
lifelink creature, you can more freely let your opponent attack if your
blocks aren’t favorable, which we saw LSV do many times in his matches on
Sunday. With air superiority, you have automatic offense, allowing you to
devote more resources to playing defense on the ground. And with vigilance
creatures, you have two-way players so you can make bigger attacks with
less worry about a counterattack.
All of these abilities open up options for you, making offense easier for
you and harder for your opponent–which is the same as making defense
easier for you. We talk about these concepts as distinct entities, but the
truth is they are all interrelated, and it’s important to know and exploit
those interactions.
here is optionality – that is, keeping your options open while
simultaneously limiting your opponent’s.
It would be nice if all of these principles could be organized into a flow
chart of sorts that maps out any given decision, but Magic is far too
complicated for that. As long as neither player is dead, then there are no
sure things and everything has a touch of gray. So the best thing you can
do is equip yourself by knowing and understanding all the variables that go
into the complex decision-making inherent in Magic. Moving forward, I hope
you all feel better equipped to approach the Boros Aggro mirrors that will
undoubtedly be quite popular over the coming months.