I learned a lot at U.S. Nationals this year. One thing that I already knew was merely confirmed: Tooth and Nail ain’t all that. I’ve always harbored this idea that it is impossible for a clunky deck built around a nine-mana sorcery to be the best deck in the field, but Nationals confirmed it. More than 1/4 of Nationals competitors chose to go with the biggest Green deck since Secret Force, but zero, zilch, nada made Top 8. No one is saying that Tooth and Nail isn’t powerful. It certainly has some big cards and can win the game explosively… but it’s not the best deck, and isn’t even the best deck to use the UrzaTron as its base.
The said alluded to other UrzaTron deck also happens to be a very clear best deck for the format. UrzaTron Blue attracted only twelve players… one fourth of them made Top 8. Not since Turbo Stasis have we seen a deck – especially a minority deck – take such a dominant position at US Nationals.
Now given the fact that we know, yes know, what the best deck is, I’m sure many of you *netdeckers* *COUGH* *netdeckers* have already begun scrambling for Triskelions and leafing through old cardboard boxes for your Talisman of Dominances (sadly, yes, I’m pretty sure it’s not “Talismans of Dominance”) so that you can beat up the kiddies who don’t have Internet access at your next Friday Night Magic. Just to make sure you get the most out of your StarCityGames.com Premium dollar, we are here to teach you The Right Play for a couple of common tactical situations. We often say that there is only one right play for any given stack and that when you don’t make that play you are making what is called “a mistake” and that most players are not qualified to state whether or not they’ve made a mistake. Like Tony Dobson, the onetime Pro Tour and Grand Prix Top 8 superstar who upon returning to Magic for Onslaught Regionals didn’t know that he could flip his Exalted Angel with Astral Slide, you probably don’t know the right interactions to maximize your card advantage, life points, mana, or broken sideboard cards with a new and fairly complicated archetype. Read on, study, grow strong… and the next time you have the chance to screw up, you won’t be able to plead ignorance as your excuse.
If you want to get better at Magic this is, of course, a good thing.
Fighting the Foil
Coming into the U.S. National Championship, Invitational competitor and English National Team member Sam Gomersall called White Weenie the best deck in the format. Though Sam had earned his spot on the National Team with, surprise surprise, the mighty UrzaTron Blue (i.e. the actual best deck in the format), he lost to the eventual champion playing White Weenie. Along the way, Sam earned a respect for Lantern Kamis buzzing around a Damping Matrix and influenced his hetero-life partner Mark Herberholz to err on the side of Suntail Hawks. The theory: Damping Matrix is great against the rest of the field but doesn’t hurt White Weenie itself. Meanwhile, the Dust Drinker punishes big spell decks… even those that play the UrzaTron or thaw out a ton of lands with Kodama’s Reach.
As an aspiring UrzaTron Blue netdecker, you may find yourself up against an opponent trying to have “Fun with Foil” as Mike Long used to say. Knowing that his White Weenie deck has the weapons to potentially beat you, the only way you’re going to win if he actually gets them is to play better.
One such opportunity is the interaction between Hokori, Dust Drinker and your deck’s varied mana sources. Now Hokori can be a double-edged sword in this matchup… It is quite strong against big spell decks that tap mana on their own turns — and your Mindslavers, Triskelions, and Memnarchs certainly fall into that category — but is less dominant against UrzaTron Blue than certain others because the Blue deck runs 3+1 Talismans of Dominance and up to the Maximum Number of Chrome Moxes. Artifact mana untaps under Winter Orb, so the opponent’s Hokori will sometimes hurt him more than it does you.
Now it might happen that you have, say, one or two pieces of artifact mana, but that your actual ability to untap lands is also relevant. How can you maximize untaps in order to cast the greatest number of spells to defend yourself and eventually take control of the game? If one of your lands is Oboro, Palace in the Clouds, you will actually have the chance to play right… or make some string of donkeylike errors that you probably don’t even notice.
Basically, when you need to tap a land for mana, always tap Oboro, Palace in the Clouds if you have the opportunity and never untap it as your land for the turn if you have something else to untap. At some point down the line, you may have the opportunity to use your Talisman of Dominance or Chrome Mox to pay the “1: Return Oboro, Palace in the Clouds to its owner’s hand” ability. This will let you make an untapped land drop even on turns that you haven’t got another in your hand, much the same way players used Undiscovered Paradise to break or combat Winter Orb back in the day. Remember: it doesn’t matter how many lands you have in play so much as how many lands you have untapped. It might not seem like you are fixing your mana by picking up a land and essentially re-playing into the same number you had the previous turn, but when you are using the “free” mana of a Chrome Mox or Talisman, you are converting a resource that is going to untap anyway into an extra untapped land either next turn or some subsequen turn that you don’t have a drop. Picking up a free mana even one out of every 2-4 turns is no mean thing when you only get to untap one land per turn.
Breaking the Board
If there’s one thing a beatdown deck doesn’t want to see out of UrzaTron Blue, it’s a Sun Droplet. If there’s another thing it doesn’t want to see, it’s another Sun Droplet. On the way to winning the Championship, Antonino DeRosa drew something like nine of the annoying two-mana artifacts over the course of his sideboarded games with Michael Patnik in the Top 4. These went a long way in frustrating Patnik’s offense and buying Antonino the time he needed to set up his powerful long game.
A single Sun Droplet will stave off as much as two damage per turn. That means that if your opponent is beating down with a single Hound of Konda, he is netting zero damage attack-to-attack. He hits you from say 18 to 16 and you put two counters on your Sun Droplet; on your upkeep you take off a counter to go to 17 and on his upkeep take off another to go back up to 18. In order to overcome a single Sun Droplet, the threat deck has to come across the Red Zone with at least three damage per turn, but if it only attacks for say, one damage, the opponent will not actually exceed his pre-Droplet life total.
While this is “annoying” for the beatdown, it’s nowhere near as bad as two Sun Droplets. Two Sun Droplets demand four damage to break even. The problem is, if you aren’t careful, sub-four damage actually allows the opponent to start gaining additional life, not just keeping pace. Say you have a pair of Sun Droplets when the opponent rather foolishly brings with his one-drop doggie. You go from 18 to 16 and put two counters on each of your two Sun Droplets. On your upkeep you take a counter off of each, going from 16 back to 18, and on his turn you take off two more, putting you at a rather healthy 20.
I know that many of you knew how that worked already, but I know that even more of you either didn’t know or never really thought about the implications of a multiple Sun Droplet board. Simply knowing how Sun Droplet math works doesn’t tell you how to play against two or more of the damn things, but the next hint will help you from the other side of the table as you continue your career as an aspiring and successful UrzaTron Blue netdeck adopter.
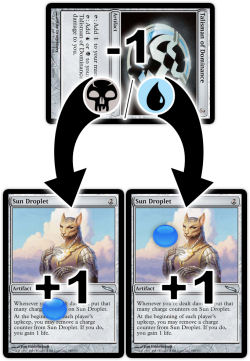
Once you are down to zero counters on at least one of your Sun Droplets, start tapping your Talisman of Dominance for Blue or Black mana. No one is telling you to tap for a Black and then mana burn, but if you have the choice between using an Island to cast Serum Visions or the Talisman, use the Talisman. If it’s between a free Swamp tap or a painful Talisman tap, ditto. The “drawback” of the Talisman will, like a poke from a Suntail Hawk, put a counter on each of your Sun Droplets. The life net cycle will begin, and your opponent – who may have been trying very hard to play correctly against your lucky duck sideboard draw – will slump in his chair or perhaps want to explore the possibility of checking out one of the summer’s many blockbuster hits rather than playing Magic, for example The Island starring The Girl With the Pearl Earring.
Take note: There is no reason to do this unless you have more than one Sun Droplet and at least one of your Sun Droplets is completely undecorated at zero charge counters (or will be, come a relevant upkeep in the case of a Serum Visions or other sorcery). It is only a clever trick if you are actually gaining life, not just making yourself take more damage against beatdown. Just don’t forget to actually take the counters off on each upkeep. Donkey.
Tricks with Top
No one likes Sensei’s Divining Top. As far as I can tell, it, much like Chromatic Sphere in blocks before, exists for the sole purpose of making one’s spells more expensive, turns more ponderous, a mini-Sphere of Resistance that only affects you… and the tournament clock. Sad to say, I’ve seen players miss their turn 2 Sakura-Tribe Elders because they automatically activated the Top on upkeep, not to mention more subtle errors based around an obsessive and, let’s face it, unfounded love affair with the one-mana artifact.
The problem, of course, is that Sensei’s Divining Top is in all of the best decks! It’s in the fake best deck (Tooth and Nail), the second best deck (Kuroda-style Red), and the actual best deck (UrzaTron Blue). No matter how good the players designing these decks, they all put the terrible Top in to make sure they don’t tap their mana efficiently so as to gain to much of an advantage over their fellows. As near as I can tell, the difference between horrible Tooth and Nail and the actually good and successful decks is the ability to get rid of the useless Sensei’s Divining Top so that you no longer have to look at it, have it distract you with its promises of card selection, let alone let it drag at your precious mana every upkeep.
All kidding aside, the UrzaTron Blue deck’s method of “getting rid” of Sensei’s Divining Top is an excellent trick and quick source of card advantage. It is deceptively obvious… Yet not the kind of play the average magician would generally think of making (largely due to an “obsessive and… unfounded love affair with the one-mana artifact” that keeps his thoughts laser beam focused inside the veritable “box”). All you do is flip the Top to the top of your deck (hopefully after looking and seeing no artifacts in the next three that you might want to discard), and cast Thirst for Knowledge. Sensei’s Divining Top, after giving you a card itself, will ensure that you have an artifact to chuck in the next three, the Top itself. Good when you want both that counter and that land, great when you have access to another Top, the subtlety of using the Top for this interaction is exceeded only by the “duh” of not thinking of it yourself (“What do you mean get rid of my Top? I’ve got to keep my Top, don’t I?”).
Bonus Top Trick
This is an old one, but it bears repeating. Red Decks based on burn have historically been hamstrung in general when compared with their blue or even green neighbors. These sorts of Red Decks don’t play (m)any renewable resources and have to rely on a properly measured succession of burn spells adding up to 20 life. The problem is that they have to draw ten two’s; four fives; two fours, a two, and a ten or something like that and just enough land to execute on their burn plans without being too flooded. Because Red Decks have historically lacked the library manipulation of Green or the card drawing that allows Blue to play lands and keep a full grip or answer threats while doing so, formats with good burn cards have often lacked actual good burn decks. Either they drew too many lands and not enough burn or plenty of burn but the wrong amount of land to cast it… all before being swarmed or controlled. Sensei’s Divining Top has changed all that, allowing the burn deck to withstand turn three or even turn two Persecutes and still come back to win. But the real reason I considered the card when designing Kuroda-style Red was its interaction with one of the signature burn cards in specific.
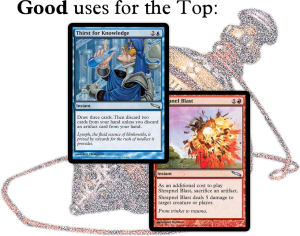
Possibly the most effective way to rid yourself of a pesky Sensei’s Divining Top is to declare its ability to draw a card, put that draw on the stack, and then respond by sacrificing the Top to Shrapnel Blast before the Top returns to your library. You will still get to draw a card, but your opponent will either take five to the face or lose his Arc-Slogger.
Up next: Tuning the Second Best Deck
LOVE
MIKE
Bonus Section: Beatings and Greetings
“How ya doin’?”
“Thumbs up. You know… Jinxed Choker is one of the big cards of this tournament.”
“Really? I wouldn’t have thought that.”
“Yeah. I just beat Aggro Red.”
“That’s not surprising though, is it? What did you do… Sacrifice his Choker and make him take five?”
“No. I made him take seven THEN I sacrificed his Choker and made him take five.”