In this article, I will walk you through a Cube Draft that featured both current members of the Limited Resources podcast. I’m a big fan of the podcast, and the original incarnation with Marshall Sutcliffe and now R&D Digital member Ryan Spain was what inspired me to create the Third Power Cube podcast about two years ago. When I saw Marshall and his current cohost Jon Loucks in a Magic Online Cube Draft, I happily jumped in. I’ve posted a few Magic Online Cube Draft videos here before, but this time I decided to add some commentary in text form in addition to commentary in-video, similar to what Sam Black has done in his recent video articles.
Having watched some of Jon and Marshall’s Cube streams in the past and from talking to them about Cube, they both trend more towards the midrange/control side than aggro (although this is fair since midrange and control strategies tend to be better supported in this cube than the aggro). When I started the draft, I found that Jon was to my immediate right and Marshall was to his right.
There are strategic implications in terms of reading signals in any draft, and learning how to read those signals is key. You can apply that similarly to knowing if certain players in your pod have affinities towards certain colors/strategies, although that kind of adjustment strategy is hard to utilize for something like a Magic Online Cube Draft, where you’re almost always drafting against seven strangers.
There’s something to be said in terms of strategy and changing yours when you’re being fed by, say, Ali Aintrazi versus Kenny Mayer, but I find that it’s more useful in in-person drafts than ones online. Since I was being fed by two players who tend to lean towards midrange and control, I kept an eye out for whether I was being cut from midrange and control and adjust accordingly, figuring that I would end up in an aggressive deck.
Since my video recording software was being very slow, there wasn’t much time for me to discuss my first pick from this pack:
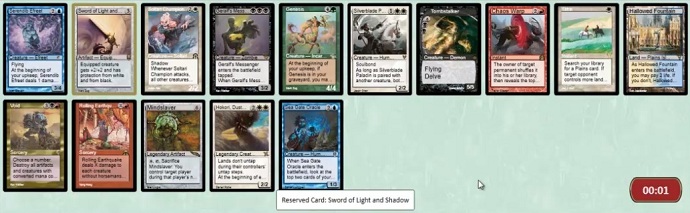
I tend to pick safe/universally playable cards pick one pack one unless a card is so good that it pulls me in a particular direction. Sword of Light and Shadow stuck out as a first pick option, but there were also cards like Geralf’s Messenger, Genesis, Rolling Earthquake, and Hallowed Fountain, but none of those cards seemed powerful enough to pull me into one of those more committal directions with the Sword there.
The deck that I ended up with was as follows:
DECKID=51034
As I said in the video, I was very surprised that the white 2/1s didn’t table while Isamaru did. Also note that the Ice Age/Apocalypse painlands were not yet included, but I still think I would have prioritized taking mana fixing as highly as I did. Cube aggro decks rely on being able to hit their early drops consistently (a problem with early cubes was that they focused on WW creatures like White Knight in their aggro sections, stressing mana bases).
Game 1
I should have played Figure of Destiny on turn 2 to turn up the clock on my opponent even though they were on red aggro. I think I was just too focused on trying to burn my opponent’s potential creatures out of the way, but that plan doesn’t really make much sense either since I didn’t burn the Guide. They did block the Legionnaire and I didn’t draw a one-drop post-Wheel to punish my play, but missing out on using my mana efficiently was quite bad.
I talked about going "over the top" like the article "Why David Price Goes Second" (not first, as said in the video), but I should have taken that idea further, such as taking out Jackal Pup, Soltari Monk, and Molten Rain for Grafted Wargear, Catastrophe, and Keldon Champion (versus my submitted build.) The drawback on Jackal Pup didn’t really matter, but keeping the 2/1 wasn’t aligning with the plan to go over the top. Although the drawback of not being able to block rarely matters for Soltari Monk, this was one of those times. Also, even though my opponent was in red, I didn’t see any artifact removal and bringing in the Wargear helps keep my guys out of burn range.
Game 2
Unfortunately, I couldn’t deal with the opposing Jitte and died in an attrition match. Thankfully, I did come to my senses and brought in Grafted Wargear, but I definitely should have cut something to avoid the Becker. Cutting Ratchet Bomb would likely have been ok. In retrospect, it was probably overly results oriented to bring it in, especially since his deck was not one that deployed multiple threats at the same casting cost.
Game 3
Although my opponent did get Jitte online, I was able to get more out of my mana by killing his threats for less mana or ignoring them (Lodestone Golem). Mono-Red Aggro doesn’t have too many answers to an 8/8 flying first striker aside from Aftershock (which would have killed him) or Chaos Warp.
In this round, I finally played Jon!
Game 1
As said earlier, I expected Jon to play a greedy deck like Four- or Five-Color Control and thought that my Strip Mine + Thalia hand would have been good, but his deck was closer to Jund Midrange centered around creatures. Unfortunately, I also assisted my own demise with some awkward plays, like attacking with Hero of Oxid Ridge along with Chandra’s Phoenix. I think that I thought that the only way I could win was with Chandra’s Phoenix (true) but that Hero of Oxid Ridge would help (untrue) so I essentially threw away the 4/2, which was amplified since I had few ways of dealing with an X/4.
I later went for the Wheel to try to stabilize, and to be honest, I don’t know why I conceded. The board state did not look good, but I at least still had a chance. The clock didn’t seem like an issue either. The matchup versus Jund Midrange was going to be a rough, drawn-out match, but throwing in the towel still looked like a terrible idea. All in all, that was a very badly played game.
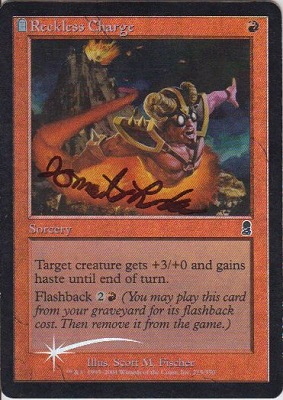
Since I was a game down and against a bad matchup, I felt that I had to adjust my strategy. I had to play similarly to The Philosophy of Fire where I wanted my deck to be the burn deck and for everything to count as a burn spell. I brought in Reckless Charge for that reason; I hadn’t seen much in terms of instant speed removal out of Jon, so giving them haste would let them act like burn spells and allow me apply early pressure before his midgame spells could shut down my offense. I would have liked to have had more burn spells to implement this strategy further, but I had to play with the cards that I had. My decision to side out the Sword out was terrible, though, as I should have cut Memory Jar and Molten Rain to keep the Sword.
Game 2
I didn’t get punished for the bad play of cracking Arid Mesa instead of Flooded Strand for Plateau, and although the Pyroclasm did hurt, the creatures did more than enough heavy lifting by taking Jon down to seven and having the flashback on Reckless Charge and a random 2/2 kill him from five.
Game 3
It did look bad for me for a while, especially since Jon’s too good a player to have fallen for the "pump Putrid Leech while my opponent has open red mana up" trap. Although I wasn’t able to enact my early game plan of softening him up with early creatures since my hand was mono three-drops (the Mox Diamond was a huge help, thankfully), but I was able to win mostly by ignoring his board and doming him with burn and creature damage. It was a close one and an honor to play him.
Reckless Charge had been in and out of my cube for a while. Sometime after this draft, I decided to take it out of my on-deck binder and put it back in my cube. I picked up a foil Reckless and, in honor of that match, when I saw Marshall I had him take the card to Seattle to have Jon sign it.
Game 1
When my opponent attacked with the morph, I figured that they had a mass removal spell like a Damnation (the Magic Online cube doesn’t have anything like Black Sun’s Zenith and they didn’t have the mana for a cycled Decree of Pain) and figured that I’d call it by blocking. I thought my opponent was either mana screwed or was in mono-black. I came to the conclusion that it may have been a Bane of the Living, but if that was the case, they would likely have just unmorphed it for X=2, so that was probably incorrect.
Game 2
I ended up mulling to five, but my opponent seemed to be in a worse position (and may have kept a bad hand) as they didn’t have much action aside from a Geralf’s Messenger and a nearly useless Puppeteer Clique (some graveyard hate would have been nice, although it was ultimately unnecessary.)
Also, it may have been worth saving the Lightning Bolt for an annoying blocker. It certainly would have been useful for disrupting the potential double block had I decided to attack with my Figure into his Geralf’s Messenger and Puppeteer Clique (I also have no idea why I considered bolting the Messenger aside from it being a really bad defensive non-cantripping Bandage). I may have been thinking too linearly in terms of going all-in on the Figure of Destiny. The Figure of Destiny could have been chumped for a few turns, but I’m guessing my opponent was tilted (which explains the concession in game 1).
May all of your opening packs contain Sol Rings!
@UsmanTheRad on Twitter
http://idratherbecubing.wordpress.com – my blog featuring my regular cube and pauper cube.
The Third Power: A Cube podcast featuring myself and Anthony Avitollo!