Always Pick The Best Card
You sit down for a booster draft at your local FNM, PTQ or even a PT, with a glimpse of hope to win the whole thing. You crack your first pack and evaluate every single card available in the booster. First, you push all the quality cards to the front of the pack, considering what will occur should you pick a specific card. Usually, this dilemma often comes down to where there are two cards that share the same color. One is usually the stronger while the other remains a quality card overall and then you have a few weaker choices from other colors, but only a single pick per color in the pack. Those “weaker” choices might seem like an option if you’re tying hard to avoid color interference with the person on your left.
Now, in this scenario, it is inevitable that different people will have a different mindset on which card to pick, depending on individual decisions, ranging from their knowledge of the format to simple preference. For me, I would always, always and always take the best card in the pack, regardless of how bad a signal I have to send to my neighbor.
The Best Card is Always the Best Choice
The reason why I suggest you always pick the best card is simply because it’s the best card available in the pack. You want to maximize your advantage in that particular pack. A draft deck only consists of 22-24 “real” cards where you had to draft them, whereas the remaining cards are all lands. You will have 15 cards in your pile by the end of each booster and usually there are around 6-8 cards that will make the cut into your deck, while the rest is either hate draft or plain trash which will end up in the sideboard. There will be a few playable cards that perfectly fine to fit into your deck, accompanied by one or two uncommon/rare bombs or “mini bomb” commons like Kabuto Moth and Glacial Ray. It’s not difficult to assemble the playable cards, but the biggest problems tend to be the bombs, which you probably won’t see after the third pick in each pack. The importance of bombs is that they allow you to play unfair games in Limited. Unfair games are always a good thing for you, since you’re able to clinch to the victory path easily while your opponent either has to come up with his own bomb or fight an uphill battle with playable cards. Once bombs show up, you’re probably winning.
In other words, having more of these cards dramatically changes your winning percentage. Obviously, you always want to maximize the number of bomb or best cards out of these 22-24 “real” cards within your Limited picks.
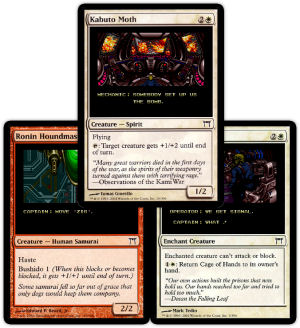
For example, say you cracked a pack containing Kabuto Moth, Cage of Hands and Ronin Houndmaster as the best cards in the pack. Either you pick the Houndmaster for a lower quality overall, but avoided color interference with your neighbor, or you just grab the Kabuto Moth and pass the obvious Cage of Hands to your neighbor. I’m happy to take the best card in the pack – Kabuto Moth – anytime. At least, my deck has a Kabuto “mini bomb” Moth in it. Undeniably, you won’t get many good White cards in pack 2, but overall controlling 2/3 of the packs is still going to give you a good shot at your first color, not to forget the fact that you have a mini bomb had already sitting in your pile.
Cards That Handle the Best Card Are Also Best Cards
Removal is always the solution to threats. They feel like a gun when you need to kill your rival armies in the war, or a lawyer when you need pretty much anything else done in the world. When you can’t find any bomb in a pack, you should almost always go for removal. When I say removal, I mean it should be a Befoul, Rends, Cage of Hands, Mystic Restraints, Yamabushi’s Flame, Glacial Ray, Horobi’s Whisper or Torrent of Stone. I would not, however, suggest you to draft multiples of Pull Under or Frostling early just because they can kill dudes. Quality removal spells are as important as bombs in a Limited deck, since they allow you to take control of the game, whether it’s by removing a troublesome attacker, pinger, or blocker. Everyone struggles to find some precious removal for their deck, at least if they weren’t one of those fortunate dudes who cracked Meloku or Kumano. Removal lets you play out one of the game’s most fundamental elements in Limited: tempo. There is no card advantage inherited in the process, but tempo advantage is what you have gained despite trading a card for a card. Therefore, you gained something simply by trading fair with your opponent, and in Magic, we always look to gain an advantage regardless of whether it’s card economy, tempo or board position. Don’t be confused, removal never improves your board position. Instead it weakens your opponent’s board opposition, putting you in a comfortable position to win the game with your present board position.
The same theory applies to removal as bombs: the more you have, the better your deck is. At Pro Tour: Nagoya, I was drafting R/B and W/B all the time, mainly because of the strength and a depth of removal Black had to offer. You’ll notice that I was forcing Black and that strategy worked fantastic in Rochester draft. That particular “force Black” strategy carried me to another Top 8 in my career. I understand that players don’t force a color in Booster draft, instead drafting what flows to them. But keep in mind that the card quality still remains the same regardless of whether it’s Rochester or Booster draft. In other words, I’m always happy to draft either Red or Black all the time, despite the fact that I have to fight for removal with the rest of the table. I have a core belief that no matter how great your combat tricks or creatures are, your deck isn’t great without an array of removal spells. In some cases, it simply can’t win. On the other hand, a heavy removal deck armed with mediocre creatures can just win games solely based on the deck’s capability of controlling the opponent’s board.
Always Pick the Best Card Over Synergistic Cards
You’re drafting one of the best archetypes in the world, B/W, and you’re opening your second booster. You have 2-3 Spirits in your pile, and you’re facing a decision of picking a Devouring Greed, or a quality removal spell, say Rend Flesh. Almost everyone in the world knows B/W is a Spirit-heavy archetype, since it offers utility spirits like Kabuto Moth plus card advantage machine Scuttling Death, and as such you are likely to end up with a lot of spirits in your pile. A Devouring Greed would be insane and end games on its own given the appropriate situation. In fact, sometimes it even turns lost games into victories. However, I just don’t buy picking it over a quality removal. I would be winning anyway if I have a good amount of removal to clear the path for my creatures to deal the dreaded twenty damage. Removal is consistent and efficient almost all the time, while offering you flexibility and the ability to control the game.
Don’t get me wrong, Devouring Greed is still a good card. But I wouldn’t pick it that early and I would never forego a removal spell for it. For me, I want every single card in my deck to actually do something significant to the board so that I won’t be holding too many dead cards that create a “virtual” mulligan in your hand. A lot of casual players aren’t aware of this issue, while the others that were able to capitalize on it are winning big all the time.
Pros are always aware of this issue – that’s why they know which cards suit their decks, as they are be able to maximize the utilities of their cards. Let’s analyze this situation together: a pro player was paired against a fairly average player who made his first Limited PT trip. Who you would assume would more likely to win the game, and why? The Pro player is clearly more likely. I mean, they’re both starting at 20 life and 7 cards, assuming that we don’t know the cards in both player’s deck, so why is the advantage already in the pro player’s hand? Simply because he likely has a consistent draft deck that only fits the card he needed to win and the capability to maximize their utility. In other words, he was trying to beat his opponent with “virtually” better cards and the ability to play tight games, further decreasing the amount of mistakes in the game to increase his winning percentage. Remember, your “best” cards allow you to play a game which gives you the best chance to win more consistently rather then grabbing random wins with situational cards.
The explanations above should guide you to pick appropriately from 1st pick to 3rd pick, and you won’t get a chance to grab good removal or bombs after that if you’re drafting with a set of quality players. Now, after the first few picks, it’s time to have a look during the mid draft of a booster, which starts around the 4th pick to somewhere around 8th -10th pick, again depending on the pack’s depth.
The Best Cards In The Middle Of the Draft
Despite the fact that I’ve been hammering down Devouring Greed’s value above, it’s invaluably high in this group. It’s fine to draft it around fourth pick or later, as you aren’t hurting your chances to draft “the best cards” anymore. Its capability to turn the game around is something really awesome, should you be able to draft one in the middle of a pack. Utility tricks like Blessed Breath truly shine here. It always trades with something more expensive than it, and that gains tempo. Don’t forget the ability to save your creature from creature combat or pesky removal, or attacking for the last two damage just for a mere one mana.
Usually, you’ll be drafting creatures at this point in the draft, so make sure you have a clear number of creatures from two-mana through four-mana and above in your pile. It definitely helps you to coordinate the right picks to draft. It’s unexplainable how or when you draft a specific creature in the mid draft – you have no other methods of learning here than to experience it yourself in order to get the feel of it, since every draft differs from one another. By now most everyone probably already knows the list of playable good creatures that you often found in the mid draft, but for convenience I’ll list down some playable creatures you’re likely to get here. They are in the group of Hundred-Talon Kami, Nezumi Ronin, Matsu Tribe Decoy, Soratami Rainshaper, Hearth Kami, etc. However, if you’re drafting Soulshift decks, you must be very aware of your low casting cost Spirits counts, as they are vital to have in the deck in order to gain an edge.
Example, you’re White and you started with a Kami of Ancient Law on turn 2. A turn later it trades with one of your opponent’s bears. Then on turn 4, you cast a Moonlit Strider, and now you already have “virtual” card advantage waiting for you while having the ability to protect one of your creatures on board. Do you see the importance of the Kami of Ancient Law here? It trades with your opponent early, and makes sure you definitely have a soulshift target to gain card advantage, should any of your soulshift guys die to removal. Imagine if you don’t have a Spirit in your graveyard: most likely your opponent will be glad to spend a Befoul or Rend Spirit to get rid of it, but if you had one cheap Spirit in ‘yard, it makes things difficult for him.
One thing I would like to add here is that I always play with 18 lands in this format, regardless of whether it’s Sealed Deck or a Booster Draft. I’m not sure whether that’s the right number for everyone, but it works well for me. 18 lands might seem a lot, but let’s have a look here. 18 lands will likely reduce your chances of mulligan, while also creating a better percentage of having the right lands in your hand and decreasing the odds of missing land drops. The secret of having 18 land though, is having one or two six-mana spells in your deck like Moss Kami, Pull Under or uncommons like Kami of Palace Fields, Sire of the Storm and so on. Green decks with their mana accelerators are a different story though. They can survive with 17 or even 16 lands, depending on the deck. Maybe it’s because I always draft controlling decks with access to a couple of high-end spells, so I feel most comfortable with 18 lands.
I hope you all got something useful here from the kid from Malaysia who always drafted fatties and pump spells in his early days.