The first previews from Adventures in the Forgotten Realms are coming at us faster than 1d12 Vampires jumping out from behind a rock. The cards are full of Forgotten Realms characters (Lolth, Spider Queen), classic Dungeons & Dragons spells (Power Word Kill), items (Vorpal Sword, by way of Jabberwocky) and creatures (Gelatinous Cube), plus callbacks to a multitude of fantasy gaming tropes. This is a set that recognizes the ascendancy of nerdcore culture: the world’s most popular TCG meets the world’s most popular RPG. Fireworks happen.
No D&D adventure would be complete without a delve into a dungeon. Adventures in the Forgotten Realms is happy to comply, introducing a dungeon-exploring mechanic to the game. A number of cards in the set will instruct you to venture into the dungeon. What that means is that if you aren’t currently in a dungeon, you enter one; if you’re already in one, you move to the next room. You can only be in one dungeon at a time and you can’t go backwards. The walls are closing in behind you, so it’s onward and upward.
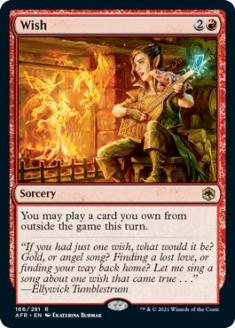
Before we start talking about dungeons, I want to mention the card Wish. Wish brings other cards from outside the game into the game, so by Commander’s Rule 11, it doesn’t work. As I’ll mention below, there is likely to be a little rewording of Rule 11 to clarify dungeons. I don’t think additional wording is necessary for Wish, because the ability to play a card brings them from outside in—from your binder to the stack, if you will. We’re happy with where Rule 11 is at the moment. As always, if there’s a new argument, we’re happy to hear it. The best place to discuss it with us is in the format-philosophy channel on the RC server.
We’ve already seen the three dungeons that will be released in the set. Today I’ll be talking about each of them, how they might fit into the Commander landscape, and a few of the exciting cards that we’ve seen so far in the first round of previews. We’ll wait for all the specific rules updates for dungeons to come out closer to release day; for now, we can talk in broad strokes.
Simply put, dungeons are cards because they contain Magic rules text that isn’t defined elsewhere; this requires that they be called cards even though they share nothing else conceptually. Other than that, they’re not what we’d consider cards in the traditional sense. They’re markers for your progress—kind of like emblems that you can physically represent. For Commander, a dungeon exists outside the game, comes into being once you first venture into it, and then lives in the command zone. You don’t need the official cards, either; any representation will do.
Fellow Commander Rules Committee (RC) member Toby Elliott, who is intimately involved in these things, assures me that there will be a whole new section in the Magic Tournament Rules (MTR) for dungeons. These rules will apply to Commander’s use of dungeons, save where there might be reference to sideboards.
Some folks have already tried to rules-lawyer on Rule 11 regarding dungeons. Since they’re not cards in the traditional sense (again, they’re more like emblems), they simply don’t run afoul of Rule 11 restrictions. For clarity’s sake, we’ll probably add the word traditional to Rule 11 so that this question doesn’t arise.
So what’s a card that does dungeon things look like? Take a gander:
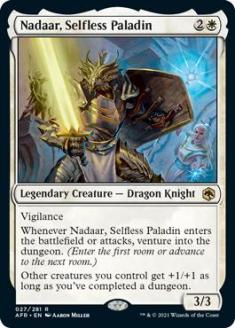
Nadaar gets you into the dungeon, moves you through, and gives you a bonus for completing it. It’s a relatively tight, straightforward idea in both theory and practice. Let’s take a look at those dungeons and how we might work our way through them in a Commander setting.
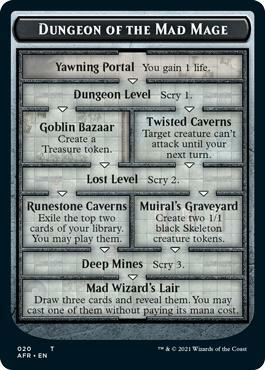
Dungeons really are about working through the small stuff until you get to the loot at the end. You might pick up little things along the way, but you’re looking for that big payoff. In Dungeon of the Mad Mage, based on an immense module (that I believe was once called Ruins of Undermountain), you’ll be doing lots of work to get there.
Gaining life from the Yawning Portal entrance suggests having cards with lifegain triggers, such as the new Trelasarra Moon Dancer or old favorites like Ageless Entity. Your next move is into the Dungeon Level, which gives you a simple scry 1. Every deck will like looking at the top card. If you’re playing Oracle of Mul Daya, you can sculpt your land drops. Some decks, like those led by Intet, the Dreamer, really want to control what’s on top of the deck.
From the Dungeon Level, you have your first fork, either to the Goblin Bazaar (a nice allusion to the classic Christina Rossetti poem Goblin Market) or into the Twisted Caverns. You’ll get a Treasure from the former and prevent a creature from attacking in the latter. The choice of what fork you’ll take is game-state-dependent. If you’re staring down a big or potentially lethal attacker, the Twisted Caverns is your destination. Note that the creature can’t attack at all until your next turn, so everyone is safe. Otherwise, you grab your Treasure and move on.
You’re funneled into the Lost Level from either spot. In this one, you scry 2. After the Lost Level, you’re faced with another fork, either plunging into the Runestone Caverns or making your way through Muiral’s Graveyard.
If you’ve set up the top of your library with Lost Level, you’ll get some payoff from Runestone Caverns. You’ll get some effective card draw, exiling the top two cards; if you want to play them, you’ll have to do it now, paying their mana cost(s). If that’s not what you want at the moment, the trip through Muiral’s Graveyard will give you two 1/1 Skeletons.
Leaving either room, you’re once again funneled into a room. This one is Deep Mines, where you scry 3. That’s a big setup for the payoff when you get to the end, Mad Wizard’s Lair. The big setup will give you a big payoff: you get to draw three cards and reveal them. You then get to play one of them without paying its mana cost. You’ve obviously set up your scry to put the splashiest, most expensive card in your draw range. It could be a setup for really going somewhere with Omniscience or just windmilling Kozilek, Butcher of Truth onto the battlefield. You’re casting it, so you get the cast trigger.
Dungeon of the Mad Mage feels very blue-mage-oriented even though every color will appreciate it. With all the scrying going on, you’re sculpting your library over a few turns to get directly into the bigger and bigger cards you want to cast. Regardless of what you do with the two forks, you’ll end up looking at lots of cards before finally drawing some and casting that bomb. Dungeon of the Mad Mage is the longest trip through a dungeon, with seven steps, but the payoff is huge.
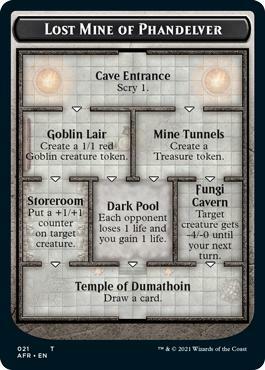
Lost Mine of Phandelver, based on an introductory module of the same name, is about taking an ever-branching path to the eventual end, which takes only four steps. Your first stop is the Cave Entrance, where you’ll scry 1. You’ll then have a choice whether to venture into the Goblin Lair or the Mine Tunnels.
Where you head will be based on what you need at the moment and where you want to go on your third step. Goblin Lair will give you a 1/1 Goblin and set up your path to either go into the Storeroom or Dark Pool. Mine Tunnels will create a Treasure token. You’ll then prepare to go into Dark Pool or Fungi Cavern.
Accessible from both of the second steps, Dark Pool will gain you a life and each of your opponents will lose a life. You could use that to set up triggers from cards like Exquisite Blood or Mindcrank, as well as some of the aforementioned lifegain triggers.
In Storeroom, you’ll put a +1/+1 counter on a target creature. Even if you’re not playing +1/+1 counter strategies, it’s a nice little bump to one of your creatures. I’d like to use it while playing Kulrath Knight, putting a counter on something scary so that it can’t attack. In Fungi Cavern you’ll make a target creature get -4/-0 until your next turn. This means that it’ll be weaker in combat for an entire trip around the table. Regardless of which of the three rooms you’re coming from, you’ll end up in the Temple of Dumathoin.
The payoff for the relatively simple dungeon is drawing a card. While it’s not much compared to Mad Wizard’s Lair, your trip has been much easier. What’s compelling here is that once you’ve completed the Lost Mine of Phandelver, you can just run it again. That next card will be waiting for you once you’ve returned to the Temple.
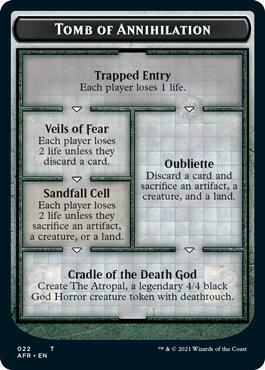
Based on a relatively large module that takes characters from Levels 1 to 11, don’t confuse Tomb of Annihilation with arguably the most famous and deadly dungeon ever, Tomb of Horrors. Your trip through Tomb of Annihilation can take either three or four steps to get to the end
Things don’t start well when you enter the dungeon, as you go into Trapped Entry. Each player loses a life. It’s not all that bad and you can draw off Vilis, Broker of Blood. From there, you have a fork which decides if you’ll take only one more step before getting to the end or two.
The one-step path is into Oubliette, echoing the card from Arabian Nights which was reprinted in Double Masters. Cutting corners to get to the boss room is costly: you’ll discard a card and sacrifice an artifact, a creature, and a land. Knowing that you’re traveling into the Tomb of Annihilation, you can set yourself up for artifacts like Mycosynth Wellspring and creatures like Solemn Simulacrum that you want to sacrifice for a benefit. If you’re playing Grave Pact effects, you’ll get triggers. Discarding a card means putting into the graveyard some big, frightening creature which you’ll just Reanimate later. Dredge decks usually don’t care about lands; The Gitrog Monster welcomes your land sacrifice.
Headed the longer way around, you’ll first get to Veils of Fear, where each player loses two life unless they discard a card. Again, you know this is coming, so you’ll be setting up your graveyard for whatever shenanigans you have in mind later.
After that, it’s Sandfall Cell. This time players will lose two life unless they sacrifice an artifact, a creature, or a land. If you’re playing Karador, Ghost Chieftain, you won’t mind sacrificing a creature. There’s a new Adventures in the Forgotten Realms card called Feign Death that you can use for only a single black mana to set up the sacrifice of any creature you want. There are plenty of artifact decks with Goblin Welder effects that take advantage of having artifacts in your graveyard. And one more time, ladies and gentlemen, there’s The Gitrog Monster for the land.
Whichever path you’ve taken, your final destination in Tomb of Annihilation is Cradle of the Death God. You’ll get a 4/4 legendary God Horror creature with deathtouch named The Atropal. Whether or not you’re going to run this dungeon again, there’s some face-smashing to be done. If you do make the run-backs, you might end up sacrificing your first version of The Atropal before creating the next.
Tomb of Annilation is a quick dungeon that’s based on sacrificing your things while nettling your opponents a little. As we know from years of playing Commander, sacrifice often leads to victory. This is likely the first dungeon I will try to venture into.
Dungeons are a mechanic that I expect to see at the lower- to mid-level/battlecruiser style of play. They’re wonderfully evocative of a thing that we all love a great deal. Once you get into the dungeon, the things you do aren’t game-breaking, but they’re also free from a mana perspective. We’ll have to see a few more cards to get a sense of their viability, but I suspect lots of folks are going to have fun with them.
We on the Commander Rules Committee (RC) have always maintained that playing Commander is the closest thing in Magic to a Dungeons & Dragons adventure. The spirit of cooperation and focus on the group’s positive experience in Commander move us along a line toward what you’d experience pulling out the dice bag and Player’s Handbook and setting up the DM screen. With Adventures in the Forgotten Realms, we’ve just gotten way closer.
Visit my Decklist Database to see my Signature Decks, the Chromatic Project, and more!