
(EDITOR’S NOTE: This was supposed to go up on Friday {and Mike even alluded to it in Thursday’s article}, but thanks to email glitches I didn’t get it until Monday morning. Hence, it does not discuss the new decks revealed both here at SCG and in Japan. Mike will get to that, trust us — The Ferrett)
Following are some board positions inspired by our Standard playtesting for Champs. Some of the positions are more-or-less “real” ones that actually came up, and others are just more interesting the way I set them up.
I am going to give you some information, and leave some space, and you are going to think about what play you would make. After that we’ll discuss the different plays and what I thought or think were or are the right ones given the information at hand.
Ready?
Then let’s go!
1) U/G versus Solar Flare, Take 1
For the purposes of this hypothetical and the next two, assume that the playtest decks are the ones I have been testing over the past couple of weeks:
You are U/G and it is your third turn. You did not have a fast draw and played Breeding Pool on the first turn. Without a Llanowar Elves or Birds of Paradise to break Garfield’s second symmetry, you were relegated to “just” playing the mighty Looter il-Kor on your second turn. Your opponent hit his first two land drops and ran out Azorius Signet. After you draw (a pathetic Llanowar Elves), this is how the game looks:
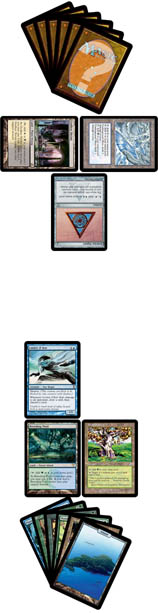
Your Board:
Breeding Pool, Pendelhaven, Looter il-Kor
Your Hand (6):
Plaxmanta
Call of the Herd
Llanowar Elves
Moldervine Cloak
Yavimaya Coast
Island
Your Opponent’s Board:
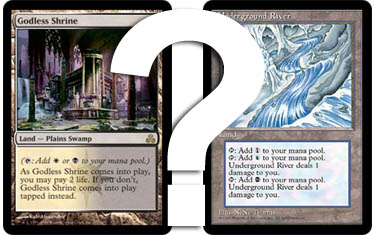
Godless Shrine (tapped), Underground River (tapped), Azorius Signet
His Hand:
Six unknown cards
What’s the play?
This one is pretty straightforward. The only reasonable play is to lay land, play Moldervine Cloak, and crash into the Red Zone for four. It is probably better to play Island than Yavimaya Coast because you already have access to pain-free GG, and with Island, you will be able to hit UU in the unlikely case that you need it short term.
Your opponent is tapped out, so there is no reason to not go as aggressive as possible. Your opponent is representing four mana on turn 3, so he is representing Wrath of God on the mana. You don’t really know if he has a Remand because he would love nothing better than for you to play Ohran Viper (remember when I said he was representing Wrath?). He is more likely to have Wrath than Mortify, so especially given that Azorius Signet, there is no reason to play specifically around Mortify; if he has Mortify, if that is the response he wants to send, he has to play it on his own turn (which many amateur players will not), which will give you the chance to elbow-drop him with the Plaxmanta.
These are the important issues:
1) It is more likely that he has Wrath of God than Mortify — simply because in all likelihood, he plays four Wraths and only three Mortifies. He is going to two-for-one you with either card if you play Moldervine Cloak and he acts immediately. There is no reason to hold back on some play. “Avoiding the two-for-one” is no reason to hold back. If you play Call of the Herd, he is going to two-for-one you because, among his myriad defensive spells, he is most likely to have a Wrath of God. Looter il-Kor is a pathetic clock, and if you play scared of card advantage, you’re just going to lose on tempo. Given the very real possibility of a Wrath of God two-for-one, the play that deals three additional damage in the short term via a 100% renewable resource is probably the best one.
2) This matchup is about controlling tempo (or, alternately, overwhelming Solar Flare’s ability to defend itself). U/G is the aggressor. U/G wins the majority of games because it can end up on the right side of some relevant metric. Often it can get ahead on threats and stop a Wrath with a permission spell and then it is all over for Solar Flare. In other games, it gets a damage lead, puts the ‘Flare opponent into a “must tap out” position, and then wins with Psionic Blast. In still other games, U/G actually wins the attrition war because Ohran Viper, Looter il-Kor, and Call of the Herd generate both card advantage and pressure at the same time. The only cards that Solar Flare can claim in response are Angel of Despair and sometimes Court Hussar; Hussar is a minority inclusion at this point, and Angel of Despair costs seven against a deck with Mana Leak.
3) If you slow play, Solar Flare can slow play. The scary part is that the more tentative you are, the more likely you are to make bad cards like Persecute relevant in the matchup. In our testing, Solar Flare lost almost every game it played Persecute. I won a game or two by leading on Persecute when Josh had Vipers or Looters in play, hitting for Blue, and having a much better chance of resolving my removal spell the next turn… But Persecute is not the card you want against a deck like U/G, whose game is largely on the board.
What are the other possible plays?
You obviously want to play a land (probably Island, but depending on if you use Pendelhaven, you might want to run out Yavimaya Coast). You can swing with the Looter and tag for two with Pendelhaven, leaving up Plaxmanta mana. Another play might be running out Llanowar Elves and leaving up Plaxmanta mana (you would probably tap the Breeding Pool and play Island), and you might play Call of the Herd for three. I don’t know that the opponent will be likely to immediately Wrath two 1/1 creatures, especially if it exposes his valuable Wrath of God to a potential Mana Leak, but both the Llanowar Elves and Call of the Herd plays are just playing into a two-for-one (and again, a fairly likely one) while dealing less damage in the short term.
Few players would pump the Looter and play the Llanowar… That play seems particularly miserable among the non-Moldervine Cloak options.
What are the additional issues?
Especially after making what I believe to be the correct play (adding Moldervine Cloak to Looter il-Kor) you may be tempted, as I was very early in playtesting, to discard Call of the Herd when the Looter connects. This play is actually one of the scripted reasons why I added Looter il-Kor to the deck to begin with (card advantage!). That said, in this matchup, that play is not optimal. If you draw an additional land, you may consider discarding Yavimaya Coast (or the new land, if it seems worse). If you draw anything else, you will probably want to discard Llanowar Elves.
If the opponent plays scared and Wraths immediately, you get a Call play on turn 4, possibly Call + Elves, potentially demanding another Wrath and potentially giving you the mana access for a second Elephant and Mana Leak mana depending on what comes up. The curve is obviously right for a flashbacked Call on turn 4, but there is no reason to give up a threat at this point when the one-drop has lost most of his utility by just not showing up on turn one.
The absolute best possibility for you is if the opponent has Mortify and slow plays it… Helloooo, Plaxmanta! The sad part is that I think the majority of States Solar Flare players would wait on Mortify rather than play it on their own turns “because it’s an instant.”
2) U/G versus Solar Flare, Take 2
Same matchup, same side, same turn: What happens if he doesn’t play Azorius Signet on turn 2?
Believe it or not, I never considered not tapping out for a second-turn Signet in our UrzaTron deck for Pro Tour: Honolulu until I actually saw Osyp waiting until turn 3 so he could sit back on Mana Leaks and Remands. Honestly, it just never occurred to me. The opponent is going to fail to play one of his six Signets in one of the following cases only:
1) He doesn’t have a Signet and also doesn’t have another play.
2) He wants to run a “Remand mana, Signet, Remand mana” sequence like Honolulu-era UrzaTron.
3) He wants to bluff Remand for some reason.
What’s the play?
I would just swing.
As you can see, the opponent can’t really be representing much that’s very interesting in the short term… It’s basically whether he is bluffing Remand or not. The only card you have to play around (at least this turn) is Remand.
A big difference between this hypothetical and the first is that the opponent is no longer representing Wrath of God. It isn’t likely that he will have a Last Gasp, but you never know. There is no reason to play into a potential Last Gasp in response to the Cloak. Moreover, the opponent’s only potential response card (presuming a stock deck) is Mortify. If you go Cloak, you are needlessly exposing yourself to a Mortify two-for-one if he has it and plays his third turn correctly.
As such, the preferred play here is to swing.
Presumably you will play land, followed by a front-side Call of the Herd (despite next turn’s card advantage, discarding Call of the Herd here is even less advantageous than the first version of this board position). In the long run, the conditions of the duel are the same: You have no Mana Leak, and you either have to expose yourself to a two-for-one or you will give the opponent sufficient time to trump you. By playing Call, you will at least give the opponent something to think about. If he plays tentatively and waits with his Mortify (assuming he has one), you get to force in more damage and more card selection with Plaxmanta.
Unlike the first hypothetical, it is Mortify that is the more important short-term response card, simply because he can’t (and won’t) have four mana on his next turn. If he doesn’t immediately stick a one-for-one, you have maybe three peels to find a Wrath-hating Mana Leak. You can sneak in three more with a Cloak, maybe find another permission card… He’s in a lot of trouble.
Swinging, Looting, and eventually Calling seems like the most threatening sequence. It is just better to wait on your three-drop, by the way… If you draw Ohran Viper against no mana accelerator, you will want to play that over Call of the Herd (it might be all over right there).
Now let’s get back to the relevant response card he might have right now: Remand. Your worst universe is one where the opponent has time to two-for-one your board and Remand your flashback on Call of the Herd. If you play Moldervine Cloak, you will be able to see pretty quickly whether the opponent has a Mortify. If he doesn’t Remand the Cloak, one of two things is true:
1) He didn’t Remand because you are now tapped out and he is going to Mortify you two-for-one, or:
2) He didn’t Remand because he has no Remand and you are probably going to mush him.
If he actually Remands, you haven’t really gotten very far, but at least he doesn’t have that Remand for some conjectural Call of the Herd flashback sometime in the future. If the opponent has Mortify, he will not Remand a Moldervine Cloak, but might Remand a Call of the Herd (probably depending on how many turns ahead he is playing). If he has Wrath of God, his goal is going to be to get a two-for-one on Cloak or Call, and the only way he can ensure that is to steal mana on consecutive turns to dodge Mana Leak, so he will Remand either. Luckily for you, the mana doesn’t seem like it will flow properly for the opponent to have Wrath of God (which is still the most likely response card) and be in position to Remand a flashbacked Call of the Herd unless he waits a little extra. You are fine with that.
All of this presupposes the opponent is playing on sound strategy. Most of your Champs opponents are going to give you the free Plaxmanta card (which ceases being free if he has a Wrath), but still buys short-term damage (which you want) and card selection (which might get you the Leak you need).
3) Switch sides: Solar Flare v. U/G
This hypothetical essentially actually happened. If you already read Josh’s article, it was the depressing tenth game of our set where he beat me with a dismal draw, swinging multiple Akromas to death with a lowly Birds of Paradise.
Here is the board:
Josh has just Dredged Moldervine Cloak. He plays a land, then puts Moldervine Cloak on his otherwise-pathetic Birds of Paradise. He has at least one other card in hand.
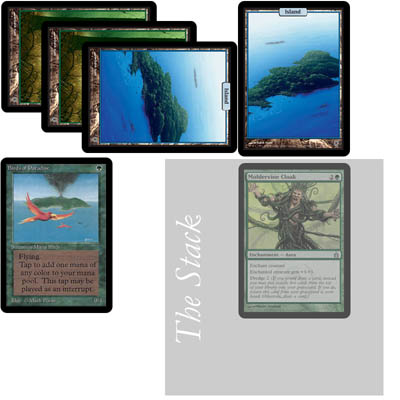
Hand:
At least one card.
You have four mana open and some card drawing in hand, but only one relevant short-term response (if you want to use it rather than Transmute it): Clutch of the Undercity.
What’s the play?
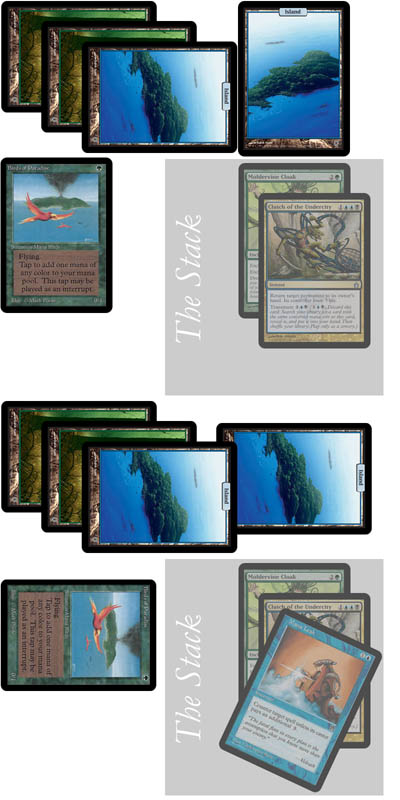
Nothing.
The answer is absolutely nothing.
You should let Moldervine Cloak hit, and let Josh pass into his attack and swing. Once the Birds of Paradise is tapped and committed to the Red Zone, unable to contribute mana to a Mana Leak, only then you should Clutch the Bird, dealing Josh three, saving yourself three, stranding his Birds for at least another turn, and essentially Disenchanting Moldervine Cloak (at least so much as that card can be Disenchanted). Given his play, this will delta six to nine life and serve up some valuable tempo in a matchup where if the other guy has the tempo, you usually end up circling the little “L” on the results slip.
What I Actually Did:
Giddy as some donk who has never read The Danger of Cool Things, I responded to Moldervine Cloak with Clutch of the Undercity. Predictably, young Rabbit responded to that with Mana Leak, which resolved. Billy stepped in and demanded that we run it back so that I would play correctly. Had this play stood, I would have avoided three damage short term, but Josh would have been able to come in for six the next turn via a Moldervine Cloak he had Dredged with the initial one (read his account of the eventual three Cloaks this game) instead of being forced to re-Dredge the first and play the Birds up sick.
Did You Spot Josh’s Mistake?
Billy really had the sharp eye on this game. Look up to the first illustration for this problem. Josh left up Island. There is almost no reason for him to leave up Island. If he actually had a reason, he would just be telegraphing Spell Snare. Leaving up Forest is much better because in the case that both of us play correctly (meaning he leaves up Forest and I wait until the attack to play Clutch of the Undercity), he can at least re-play the Birds so that it is not sick the following turn. Single Island does very little even if my removal card is Mortify.
4) U/W versus Dragonstorm
Following is a board position constructed using multiple elements from different games inspired by a midnight playtest session with Billy last week. The matchup was U/W tap-out style control versus Dragonstorm. The matchup heavily favors U/W, with Dragonstorm winning (in our testing, at least) only when U/W needlessly played the daredevil or was careless on Dragonstorm’s key resources.
Your opponent has not had the best of draws. He has, however, end-of-turn flashed multiple Bogardan Hellkites into play, slapping you for five or ten a couple of times. You have gotten a couple of life points back with Overrule for two at some point, and are finally serving with Akroma, Angel of Wrath. While seven of your nine mana was tapped for Compulsive Research + Resurrection, the other guy, who had at that point three cards in hand, thought for a moment and elected to spend five of his eight available to run out Hunted Dragon. Mana Leak is worthless.
He is at nineteen. You previously put him on twenty-five with a Condemn, and took six back with your Akroma, Angel of Wrath.
Two Dragons are in the Red Zone, one Bogardan Hellkite and one Hunted Dragon; two Dragons are in the graveyard, both Hellkites.
You’ve got a fantastic hand of Careful Consideration, Adarkar Wastes, Resurrection, Condemn, and two Mana Leaks. Though it took you a long time to find any Akroma, Compulsive Research actually gave you two last turn; you discarded both pre-Resurrection. With your mana situation, you could not stop Hunted Dragon with Mana Leak, but at the present juncture, Condemn should be able to stave off either… and of course you are sending with the likely inheritor to the title Best Fatty Ever Printed.
With seven life and eleven power flying straight at you, what is the play?
What I Actually Did (or what I would have done, if the facts had been shaped a little differently):
Like you probably would have, I blocked the Hunted Dragon, resolved First Strike damage, binned that 6/6 with my 6/6, and then Condemned the Bogardan Hellkite before damage. This wasn’t the worst available play, but it was definitely a below-average decision.
You almost certainly you have to block, but Condemning a Dragon from this spot is a knee-jerk decision. I am not sure you have to Condemn anything… Which is not to say that Condemning is entirely wrong, but it is important to look at the Condemn decision. Your hand is almost ironclad if you don’t die, and it doesn’t look like you’re going to die here; he almost has to have main-deck Gigadrowse and a legion of angels at his back to get this one.
The life gain from Condemn (on Bogardan Hellkite) would put him at twenty-four. This adds essentially no time to your fastest clock because with the Hunted Dragon’s Knights allowing you to command twenty-four power, there is no difference between nineteen and twenty-four.
One weakness of the play I described (which, I think, is the scripted and automatic one), is that I would have blocked the 6/6 and Condemned the 5/5. This is intuitive in that you want to minimize how much damage you take, and how much life you are giving back. In this case, one life is actually relevant to your clock, because at twenty-five life, the opponent gets a full additional turn at one life. This seems crazy! Why would you not want to Condemn the 5/5 then?
In a situation like this, where you are probably going to win the game in the next two turns, the big question is whether or not you are letting the bad guy back in the game. Read Condemn. What does it say? Where does it put that Dragon? That’s right: Back into the opponent’s library. The opponent isn’t going to rip a Dragon: The danger is that he can set you up with something like a Gigadrowse and then Dragonstorm you out. When you are putting a Dragon back into the opponent’s library, let it be the one he has to hit you with rather than the one that can kill you just by coming back into play.
Another non-intuitive play that has nonetheless come up quite a bit in our playtesting is to Condemn Akroma next turn (after you’ve put First Strike damage on the stack, of course). You hover around the same amount of life, with a similar outlay of resources, but this way you can run Resurrection for lethal Akroma two turns down the line without ever giving the opponent an incremental Bogardan Hellkite to access.
This is an interesting hypothetical because as long as you block, you are likely to win no matter what. You are only going to lose if he has Dragonstorm and can somehow resolve it for two or more creatures and can deal with or overwhelm your Akroma somehow. If all he has is another Dragon, you can counter it — or if it’s a Hunted Dragon, Condemn that with the Condemn you didn’t spend this turn. He isn’t representing the mana for Dragonstorm, at least without some cheating, and you can actually disrupt his tempo with a Mana Leak on Seething Song if you want to, given his hand size.
This is certainly a debatable point, but I think in this case it is right to block Bogardan Hellkite, go to one life, and crack for twelve. Dragonstorm has got to have some hand to win in the next two turns. The Hunted Dragon is essentially blank to an Akroma after one swing (especially if he doesn’t have Gigadrowse), and if you don’t give the opponent a life boost, a consecutive Alpha Strike should be enough to win, even with the Dragon back to eat one of his Knight friends.
I know that some of these plays seem simple. It may even be difficult to see the relevant differences between two different decisions, but look at the facts. Look at the probabilities.
In the first hypothetical, Moldervine Cloak is a gimme. You are not in the best of worlds if the opponent has the right cards and plays correctly, but if you can’t see this play, you are in trouble. In the second, playing the Cloak is needlessly less tight than playing a Call of the Herd… But it will still put you on a winning track against the majority of Solar Flare opening hands.
In the third hypothetical, though, you can see how badly a mis-mana tap can affect U/G’s ability to continue to apply pressure, and how different the world looks if you forget to pass priority one or two times before making what amounts to the exact same play. The last one is one that I think is less clear than the others (which, in their own ways, are debatable to one point or another). The main thing that I wanted to share here — which, like choosing not to play a Signet on turn 2, was something that never occurred to me — is that even when you’re winning, Condemning a Hellkite back into a Dragonstorm player’s deck is introducing variables that you might not want to deal with or think about.
Right before his first PTQ win ever, I told Pselus (James Wright in the real world) a devastating mid-combat trick with G/W guaranteed to trump Tallowisps and eat Ghost Councils. Using that play helped James’s team to the Top 4. All I’m saying is, even if you can debate the “Condemn/don’t Condemn” on the basis of giving the opponent a free turn, it is important to at least be aware of the limiting factors on a very specific combo card like Dragonstorm.
Talk amongst yourselves.
Love,
Mike