The first decision of every draft is whether the team that wins the die roll wants to kick off or receive. There are those who think this is a decision, but I am not one of them. This decision is easy if you understand all the ramifications, because one choice dominates the other. It doesn’t even matter what you are trying to do. Reactive strategies, fixed strategies, flexible, inflexible: All of them should make the same decision. To prove this, I will go pack by pack. For now, consider "our" team to be kicking off, and "their" team to be receiving. I won’t be going over the basics of Team Rochester strategy at this time, because that’s a separate topic – I just want to narrow in on this one decision and how it shapes the draft.
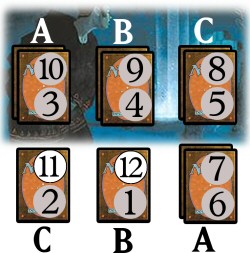
In pack one, our B player will open. Presumably we will look to take the two best cards, or two good cards that make it hard for the other team to prevent a good wheel or to get good use out of their three picks. Most of the time our decision comes down to one question: Which of the top two cards do we put in the B seat, and which in the C seat? That depends on our strategy, and of course it reveals some information about that strategy. It also shows something if we conspicuously decline to take a card that is clearly one of the strongest two in the pack. At this point, we’ve made one Boolean decision. However, also note that we can take any two cards we want to here because we haven’t made any other picks and we can make later picks to support what we open. In Kawigawa block, for example, we find out right away whether or not we should be drafting support for a Glacial Ray. Opening one here or in pack two gives us the most time to get the Arcane cards for splicing, and if we miss we get to properly downgrade such cards as quickly as possible.
They then need to place all three of their cards, which will tell us even more about them than we told them about us. There is a much smaller warping effect here from the best cards in the pack. We often have only two choices, and those two can be misleading to our opponents. We might not even intend to play both cards depending on how we value color placement, even though we have far more flexibility then they will have three packs from now. They need to place all three cards they choose, and can place them anywhere. If they take a Green card, they’ve just placed their Green deck. The same goes with every other color, although some can be split later, and if they try to hold off on taking cards of a color whose placement is valuable information, it tends to hand our A player a strong wheel.
The best example there is Green, because there are several color combinations that are highly frustrating for a green drafter. That’s not just Kawigawa block, it tends to be every block. If you can draft a Green deck that can beat the anti-Green deck, that alone can give you a dominating position in Team Rochester. In fact, that was the key to our Yop 4: Everyone thought that the traditional anti-Green strategy, Blue/White, had a great matchup against Five Color Green in Invasion. Normally they were right, but I found a way to draft the Green deck that beat them. Not only did I win the matchup, but they would work to set the matchup up in the B seat which helped us even more.
When they pass those two Green cards to give you a good wheel it means little or nothing, because our A player all but has to take what the pack gives him to avoid passing those cards back to the other team. This is true no matter what they pass, unless the pack is unusually deep. It doesn’t mean he has any intention of playing those two cards. After that, they must place the three best remaining cards again. After those six picks, if they’re not actively disguising their deck placement we have a ton of information. They have only the locations of our first two picks and a little bit of info from the wheel. While it may look like we will have to abandon picks to avoid giving away a ton of information, this is misleading because in a future pack those picks often would end up having no chance of making your deck from the moment they were taken – and for the wheel, what is even more important than that is that they would know which cards you can’t play. Right now, they don’t know if the wheel they gave you is real or if it was a counterdraft. Either way, you made the best of your cards and they now may actively sacrifice position to prevent those cards from being good.
At this point, we have informational advantage and neither team has sacrificed selection since everyone chose from a fresh pack. If they pulled fancy tricks to limit what you could wheel or what that wheel matches up against, they’ve sacrificed in a way that could turn out to be premature. They have only one advantage in pack one, which is that their initial placement can react to our initial placement and they can try to trap our A player by passing him cards that lead him into a poor matchup. The primary reason people want to receive at all is that they drastically overestimate the strength of that knowledge and the knowledge of the first pick that is coming out of pack two. The reason they overestimate that information is that teams rigidly stand by those picks when they shouldn’t. Sometimes those cards are bombs, in which case you now have the chance to adopt your decks to use them properly, but often the first two picks are nothing special. The other reason is that too many teams fall into the trap of letting their A player be defined by the first pack wheel, the same way the B and C players are defined by their first picks. I would estimate that a full third of all wheels are so poor that there is no reason to even consider trying to use both cards in your deck and if you’re using both more than half the time it’s probably a flaw in your draft strategy unless you are taking the colors that opponents think can’t be placed in the A seat. In that case, there’s a flaw in someone else’s draft strategy, which is far better.
Don’t assume that your choices have already been made, because things are just getting started. That is the other reason going second is considered a viable option, and it comes into play when the teams are very poor. Often poor teams don’t know how to give up on their first few cards. This happens in normal drafts too but it is far more pronounced in team Rochester. Not knowing what the good matchups are, the right positioning is or sometimes even what their opponents are drafting, such teams end up letting their first picks carry them through the draft via inertia. I started with a green wheel, so I’ll draft green whether it makes any sense later on or not. You can line them up opposed to white deck that loves to face green and even do it in a naturally white seat and they won’t realize what you’re doing until too late. That lets you manipulate teams that are bad enough by receiving rather than opening.
Look at it this way: The opening team has the chance and the duty to adapt to the cards and opponents in every draft while the receiving team can pursue their standard strategy most of the time. In advanced play you want to be the one who has to make those hard choices, knowing that you will be rewarded if you choose wisely. If you’re not that good and your opponents are bad enough, and they have to be very bad, it becomes an option to instead attempt to trick your opponents into choosing poorly. I don’t agree with it, but I have to point out that it is there. My reaction to this is that Team Rochester is by far the most skill-based format in Magic. If your opponents are so bad that you want them to open the first pack – and if any advantage can exist in this direction it is still very small – then you are going to win the match. It only pays to count on bad play when you have no choice and the payoff is good enough. All right, back to the draft.
Pack two begins, and our C player gets the first pick. Often this pick is forced, perhaps even no matter what everyone is drafting: There is a card that cannot be passed. In this case, you reveal info that is equally useful to both sides. You learn a card that will be in his pile, and they learn what card they must face. People forget that this information is double sided, and only think about their new knowledge and not yours. Yours is key as well, and you need to keep in mind that if this pack had occurred three packs later you still would have been forced to take that same card even if it was very hard for you to play. At other times this pick won’t be forced and you do have to give up information. Three things have been fixed: You have shown your second pick, and they have distributed a 3rd-to-5th pick and a 8th-to-10th pick to your opponent. A lot of the time your choice here will focus on passing them a difficult pack to handle rather than taking the strongest card, as they have to take picks for three decks, show their strategy and avoid giving good picks to your other two decks. Their picks here will never be forced, as they can once again move the cards around at will among their teammates. After that, they’ve now done that three times and should have told you their plans. Choosing who wheels which two cards here is your first true reactive decision – and then they all choose together again! Your C player then mops up whatever is left regardless of color.
Pack three comes… and they have to choose how to distribute the cards again! This time it’s the first three picks, and you’ll react with total flexibility, so this is the most decision intensive pack in the entire draft for both teams because the colors are not yet carved in stone. Once these picks are finished, they just might have carved in two to four of their six color decisions and revealed five or sometimes even six. You began to think about pouncing on them last pack, but this is the time to show your true colors. You will have total flexibility in distribution for the rest of the first six packs, with the knowledge of a ton of their decisions and what all your “forced” picks are in the first six packs. If you don’t get overly attached to the two first picks and one second pick you have, you can set up in reaction to what they are doing. If such a switch isn’t worth it, then either you got bombs that are hard to use and powerful enough to use anyway (in which case, as you’ll see, good thing you know now), or color matchups don’t matter much in this format. Sometimes it’s about individual cards instead of colors, as was true in Mirrodin block, and knowing one or two cards from pack one doesn’t help you react.
Pack four is the first pack where someone can get into serious color trouble through no fault of their own, because they have players locked into colors about as much as yours are and they have to place the first two cards. If they open a bomb, it must be taken, but what if it is best in their A deck? They’re stuck. You, on the other hand, moved your A deck into B when this happened because it was the first pick of the draft. They had to distribute their 3rd-to-5th picks in pack one based on two picks and a lot of guesswork and fixed strategy. You can move them around knowing enough to put each opponent on at least one color and knowing what early picks of your own must be accommodated. Because you have perfect flexibility, you’re rewarded for having already made other picks and because they don’t they are punished for having been forced to make other picks earlier.
That’s the key to kicking off: You get the most important information first, then make informed decisions with your later picks. First you get the knowledge, then you make the choices. They have to make those decisions that most can benefit from that knowledge first, then they get the information they needed earlier because now they have to make the decisions that the cards can force on them when they might not like what the cards have to say. Meanwhile, they’re revealing more about themselves than you are showing about yourselves, as long as you don’t make the mistake of becoming overly attached to one or two cards.
Pack five forces them to make a first pick that they might not be happy with, then hands you the pack to distribute perfectly amongst yourselves while giving you the chance to bounce cards that only their C player can take. When this happened for them in pack two, you had the chance to switch up your picks and decks in reaction to their choices, making it dangerous for them to bounce anything that was any good at all. You get this weapon first, and get it most often. They get hosed twice on this pack and you’re grinning the whole way. Pack six gives both sides maximum flexibility, but with knowledge. These packs reinforce your decisions instead of what happened when they had this pack where this pack dictated their future decisions. Pack seven, the first pack of the second set of the draft, also favors you because you are in a much better position to alter your A deck to accommodate a forced first pick than their A deck will be three packs later.
That also brings up a key tactic that Illuminati developed based on kicking off, which is to enable color shifting by taking away the justification for color placement. I will use Onslaught Block as the example, because that is when we created the plan and where it is easiest to see. In Onslaught, Red rules the first picks with Sparksmith and a lot of very strong burn cards. Because of this, every team knew there was a natural advantage to putting Red in the C seat. However, when you kick off that advantage only holds for the first two packs of the draft. In Scourge, Red isn’t particularly strong in first picks. If I can confirm early that there is no Sparksmith in the second pack of the draft, I’ve removed the need to keep Red open for my C player. This was best of all when the pack wanted us to take the second best common in the set, the black card Cruel Revival, and we could then switch the Black drafter with the Red drafter and often improve our matchups in the process.
Red tends to be the natural color to put on the left because large expansions tend to have several strong burn cards. Those burn cards more often than not are many of the best common first picks in the set, and other mass removal cards at uncommon and/or rare help out as well. Sparksmith is a dramatic example, but cards as simple as Firebolt can end up taking their place. Odyssey Block was a great time for the switch, because Red naturally went in the C seat during Odyssey but not during Scourge. Meanwhile, the most important pack for positioning was not the first pack but the second: Torment was coming. Suddenly it would be all Black all the time, and that was especially important if Faceless Butcher was opened. If you receive, you’d have three Torment packs before you find out if your A player is going to open a Faceless Butcher. There’s no way you can delay deciding who your Black mages are for that long. However, if you can deal only with six Odyssey packs, then you have a good chance of being able to retain that flexibility, especially if your plan if you do open the Butcher is a Black split. By giving the B or C player the early Black cards if Black is light, we delay our decision until we have the important information: Is there a Butcher or other Black card like Nantuko Shade that we simply have to take? Knowing the existence of this card, we can now split Black (since Torment is coming for five more packs) and move Red into the B seat if we like. They can’t afford to wait for this information, so that pack would have given them fits.
The best part about this switch is that the A and B players are made identical by getting rid of pack seven first. From this point on until pack three, every time your A player picks, your B player picks. When one doesn’t pick, the other doesn’t pick. You lose nothing at all by pulling a switch. The same held true for pack one once you got the first two out of the way: In packs three to six, your B and C players are identical.
You can use this strategy any time you’re placing a color in a location just for the first picks of the first or second pack, and it’s even better if you’re doing both with two different colors: Resolve them early, so you know either that you’re locked in by the cards or you can pick up extra flexibility. Without that same flexibility, your opponents are all but forced to let you get good matchups or risk disaster in packs four and five when dealing with the first pack dilemma. Later, if they face the second pack dilemma, they’ll have to choose between letting you have good matchups and risking disaster in pack ten.
The conclusion is simple: You need to kick off the draft and open the first pack. It gives you more options, strengthens your position and ironically makes their job harder than yours. It’s not just better to kick, it’s easier too. If you’re drafting at the end of a PTQ, the other team will be forced to make decisions with no clear answers while your team can use the packs for guidance even if you haven’t practiced enough to take advantage of some of the more advanced strategies here. In some formats, this is just a nice plus. In others, it is enough to open up new doors. I would rather win the right to kick off the draft than have the first turn in two of the three matches. The only possible exception, and even here I don’t agree with it, would come if color matchups are the key to victory, the first pack’s biggest bombs are not color intensive and your opponents are known to be incapable of abandoning their first picks whether or not they are bombs. That last point is vital. They must consistently make this mistake, no matter how blatant your reaction, for receiving to even be an option. A last note on this subject is that in practice you should spend equal time kicking off and receiving. This lets you get proficient from both positions for when you face others who know to force you to receive and gives you a more balanced perspective.