In the Magic Online 2013 Holiday Cube, as I discussed in my article about the changes to it from the 2012 iteration, the changes were mostly minimal and phoned in. Since the overall structure didn’t change very much (the removal of Exhume made Reanimator a bit worse,) I approached it in a similar way to last year.
Draft
In the draft, in retrospect, taking Frost Titan may have been an incorrect pick, at least, with regards to taking it so early. There isn’t a lack of finishers for blue decks and while Frost Titan can get underrated, it’s a good one; but control finishers aren’t difficult to get. Yawgmoth’s Will may have been a better option since it’s quite powerful even without any power in the deck, but I liked the way that the deck turned out, aside from not having enough artifacts to play Tolarian Academy.
Round 1
The hand that I mulliganed in game 1 was a pretty easy mulligan due to having no lands:
Since the opponent was G/R Midrange, which wins with large creatures late in the game, I felt confident bringing in Sheoldred since it was difficult for the opponent to kill with Chaos Warp being the only out (I had the Beast Within) and possibly a few others like Karn Liberated. Although the 5BB cost could have been a bit awkward, the game was going to get to the stage where by the time I wanted to cast it getting the 5BB shouldn’t have been too difficult.
Round 2
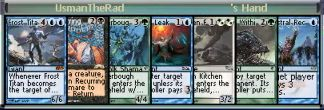
In game 2, I mulliganed this hand:

I added in Llanowar Elves to make it so that I could be a bit quicker to race the control elements like Karn Liberated that I had seen.
Although any land would have put me right into the game and I had two draw steps to draw one, I still felt that one of the ways that I could have lost was to fall behind on mana in this control matchup, so it was an easy mulligan. However, I also should have mulliganed the next hand, as having just a four-drop (albeit a really good one) and all lands versus a control deck with a ton of counterspells and spot removal seems like a bad idea. I should have just gone to five cards.
After game 2, if you think back to the contents of the deck, the black component of the BUG Control deck was mainly disruptive elements (Thoughtseize and Shriekmaw, the latter’s targets being hampered by the opponent being in black) along with other elements that appeared to be weak here. Recurring Nightmare is awkward against a deck with a lot of spot removal and counterspells since there are times when it’s a bad topdeck, and Damnation is not so great against a deck whose goal is to control the game.
Because of this, I knew that my role had to change from BUG Control to a more sleek Simic Tempo deck since I couldn’t afford to reach the later stages of the game. My deck was worse at being the control due to the inconsistencies of being three colors with poor mana fixing and not wanting to draw the wrong spells at the wrong time.
I decided then to cut the black spells in the deck, keep Llanowar Elves, add Call of the Herd and Willbender, and splash Ral Zarek since the opponent’s creatures almost all died to Ral’s Lightning Bolt. I cut all of the Swamps and changed them to a mix of two Forests, two Islands, and a Mountain. After doing that, my strategy ended up working out, as I went on the beatdown path and pushed the advantage so that I was able to win the third game.
Round 3
Since the opponent had a lot of land-destruction effects and nonbasic land hate, I took out the Simic Growth Chamber for a Forest. I find that people tend to get scared of the drawback of bounce lands being able to be killed by LD, and to be honest it was more wanting to blank cards like the opponent’s Magus of the Moon and Goblin Ruinblaster that made me sideboard that out. The fear of getting blown out by LD did get me in game 2, as did Bloodbraid Elf being insane versus Remand (Remanding the Bloodbraid was a mistake; I didn’t get punished by it too hard, but I still got wrecked). But being able to go beatdown and controlling the opponent’s threats made game 3 a win.
I hope you enjoyed this video walkthrough and additional commentary in the article. If you enjoyed this video, check out the other Cube Draft videos that I previously recorded.
May all of your opening packs contain Sol Rings!
@UsmanTheRad on Twitter
My blog featuring my Powered and Pauper Cube lists: I’d Rather Be Cubing
Cube podcast that I and Anthony Avitollo co-host: The Third Power