
…But winning is pretty great. After Justin O’Keefe’s victory at the Modern Classic in Baltimore, which I covered in a Daily Digest here, Todd Anderson played his Dredge list in a VSVideo and came away incredibly impressed with the deck. It was a quick sell for Tom Ross and me and we were soon all locked in on the deck for #SCGNY. Their help in learning the deck and tuning a final list was invaluable.
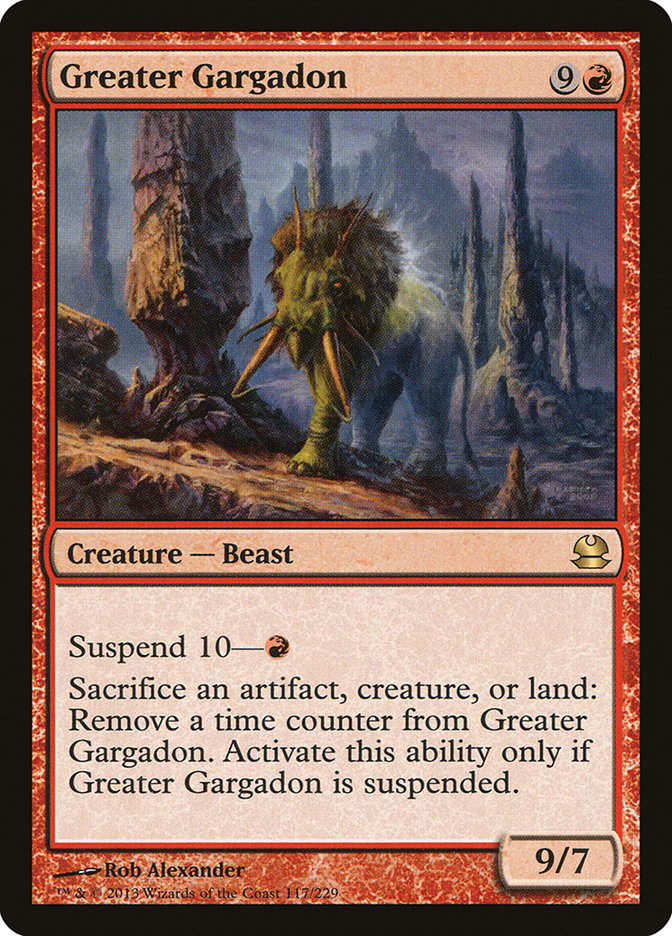
I had seen the previous Dredge lists in Modern, but they lacked the signature degenerate explosiveness that successful Dredge decks have had in the past. Life from the Loam and Conflagrate looked like a slow, cumbersome end-game plan and the inclusion of Greater Gargadon made Bridge from Below a viable option, leaving you with an explosive aggressive game plan that is naturally resilient to most removal, while Greater Gargadon insulates you from exile effects like Path to Exile and Anger of the Gods.
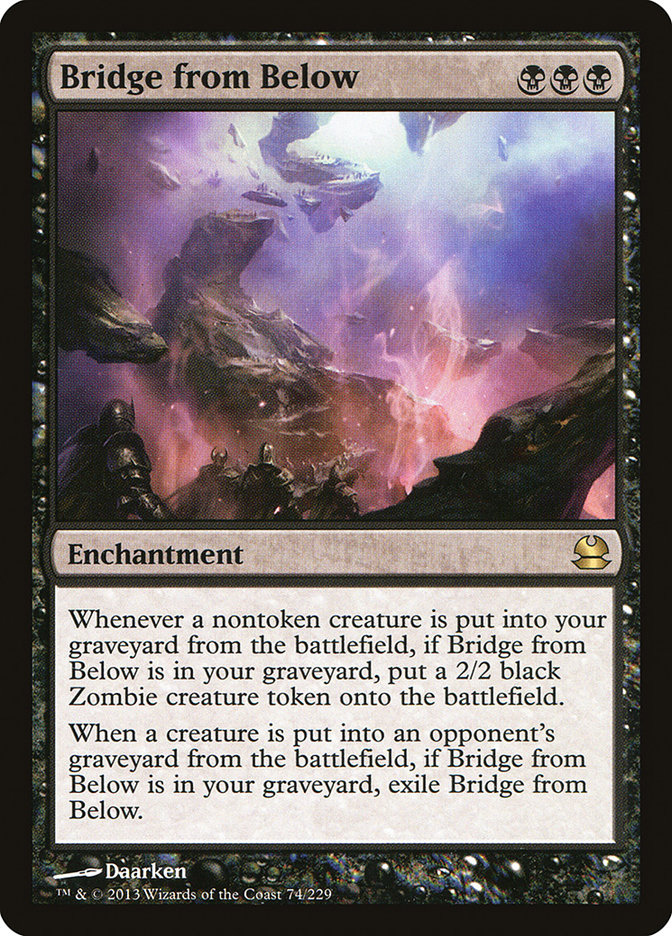
To me, the Gargadon-Bridge package was the missing part of the deck that would elevate it from fringe archetype to format contender. I was determined to utilize that engine to its fullest, so even when Tom expressed his doubts about it and hedged his bets by playing two copies of each along with some traditional Life from the Loams, I stayed true to O’Keefe’s list.
Todd ended up much closer to my list, but we all had subtle differences based on personal preference. I registered the following list:
Creatures (29)
- 4 Golgari Grave-Troll
- 1 Golgari Thug
- 3 Stinkweed Imp
- 4 Greater Gargadon
- 4 Narcomoeba
- 4 Bloodghast
- 4 Prized Amalgam
- 4 Insolent Neonate
- 1 Haunted Dead
Lands (19)
Spells (12)

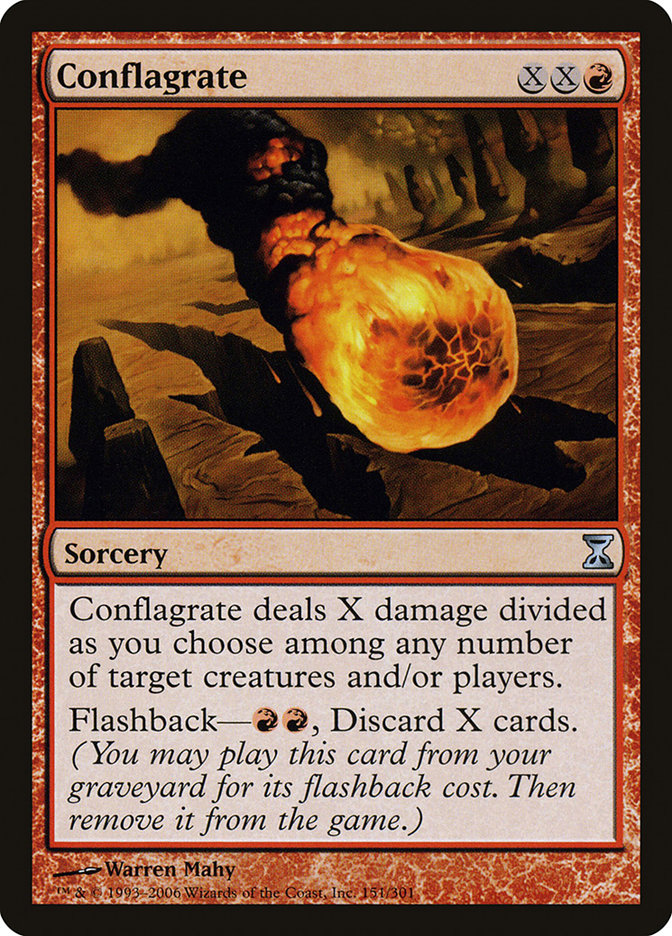
The only maindeck changes I made to O’Keefe’s list are the addition of a nineteenth land and a Haunted Dead. These were cards all three of us were in agreement about, and Todd and I especially wanted Haunted Dead; without Life from the Loam, Conflagrate would be significantly worse and you need some ways to discard key cards from your hand. The fact that Haunted Dead gives you an instant-speed way to recur Prized Amalgams leads to some especially explosive turn 2s, where Conflagrate is best used a few turns later, so having a split is beneficial.
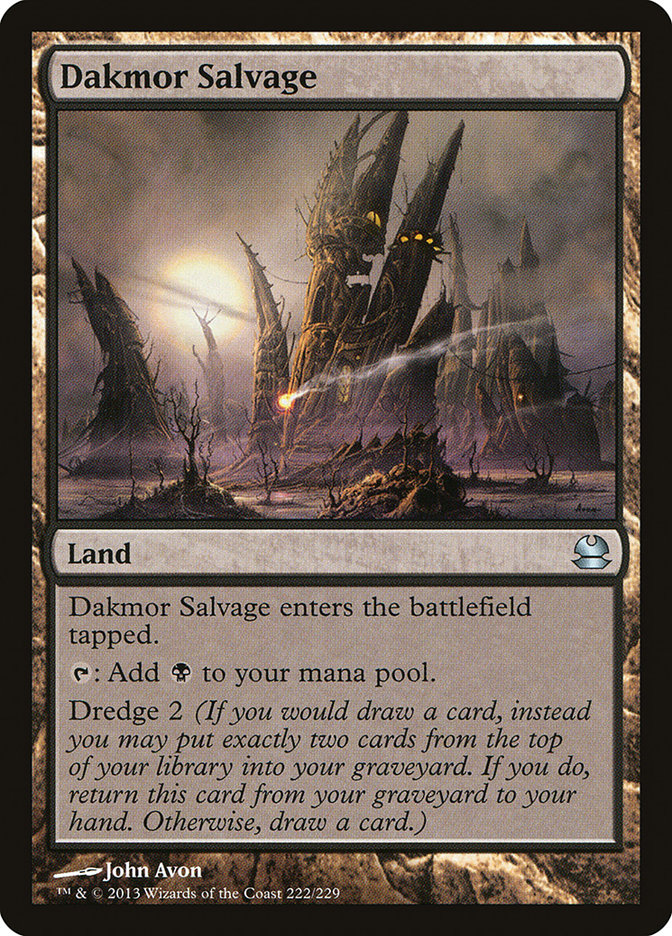
The nineteenth land is a concession to the fact that you always want to make three land drops so you can Flashback Faithless Looting, and you are rarely working with more than your opening hand plus a couple extra cards from a turn 1 Faithless Looting. Mathematically nineteen is still a bit short to hit three lands consistently, but the presence of Dakmor Salvage means that you can frequently get your third land from the graveyard, so you can be a land or two short of the abstract ideal and still function smoothly.

Rally the Peasants was the easiest cut since it mainly functions to help race other fast decks, a function that is too narrow to make the cut when space is so tight. The fourth Shriekhorn got the axe because, well, it’s Shriekhorn.
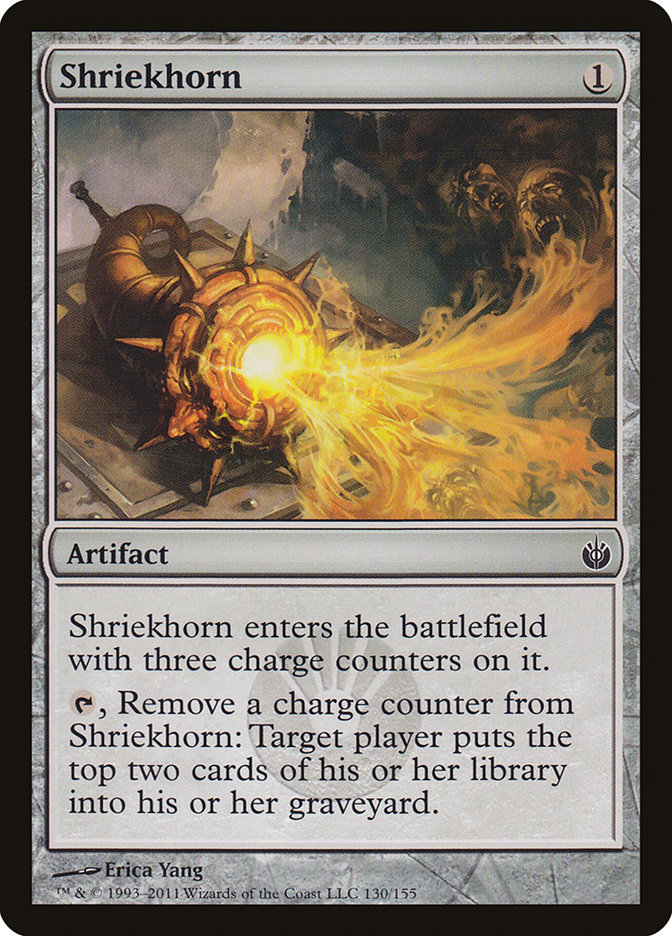
That isn’t to say that Shriekhorn isn’t important to the deck, since having one-mana enablers is vital to the deck’s explosiveness. All of your best draws involve playing some combination of three one-mana cards on the first two turns, whether Faithless Looting, Insolent Neonate, Shriekhorn, or Greater Gargadon, so maxing out on them is valuable. But with Shriekhorn being the worst of the four, a somewhat poor topdeck, and much weaker in the post-sideboard games when your opponents are likely to have graveyard interaction, shaving one made sense.
The key addition to the sideboard was Abrupt Decay, which was initially suggested by Tom Ross. Scavenging Ooze is the most common piece of “hate” in the format, and being able to bring in a card that answers it while also handling potential Grafdigger’s Cages or Rest in Peaces is invaluable. You never want to sideboard scared with Dredge, since each card in the deck makes the others better, so every reactive card you bring in is at a significant cost to your engine.
Ideally you will never bring in more than four or five cards in a given matchup, and Abrupt Decay lets you accomplish this without having to worry about losing to the vast majority of hate in the format, with Leyline of the Void as a notable exception. Fortunately, Leyline of the Void was not going to be popular, although that may change after last weekend.
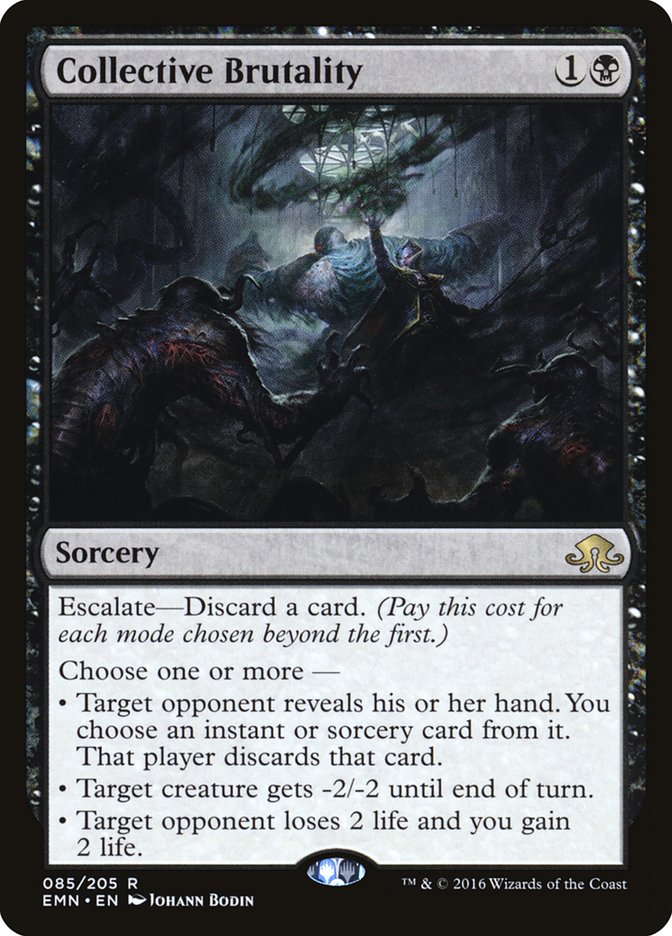
The Collective Brutality is the last innovation we made to the sideboard as another versatile answer that can kill early Scavenging Oozes, give us something to disrupt spell-based combo decks, and most importantly serve as a haymaker against Burn. Killing one of their early creatures, stripping a burn spell from their hand, and draining for two, all for two mana, is an absurd deal and ideally you will stock your graveyard in the process.
Burn is a tough matchup since they roughly match our speed and are very consistent, so there is a lot of pressure to have an above-average draw. I would’ve certainly played more if I had the space, but one is better than zero, so one it was.
The Tournament
My tournament was really the story of two days. On Day 1, I was commonly sideboarding down on Shriekhorns, only to find my deck was slower than I would like. To compound this, I wasn’t drawing Greater Gargadon a lot; as I mentioned earlier, you really only have your top seven to nine cards to operate with. As a result, my Bridge from Belows were ineffective. Fortunately, the rest of my deck was more than capable of winning games on its own, leading me to believe that the Gargadon-Bridge package was unnecessary.
Todd had a similar experience, and I was resigned to aggressively siding out that package whenever possible while hoping that my severe deckbuilding mistake wouldn’t cost me.
However, my Greater Gargadons showed up on the second day, making my Bridges incredibly effective and carrying several games that I could not have possibly won without them. And in fact, my lone match loss on Day 2 could have been reversed had I not brought out all four of them, leaving my clock against Tron too anemic.
Now, I could blindly assume one day was more representative of the norm than the other, but that is a poor means of analysis. The major takeaway from my experience is twofold:
First, you don’t need to overload on Bridge from Below for them to be effective. I was still frequently bringing two out in the post-sideboard games, and having a single Bridge from Below was more than enough to close out games that my creatures otherwise would not. There were still games on the second day where I did not have Greater Gargadon and Bridge did very little, but the added dimension was so instrumental in some games that I am extremely hesitant to cut them completely.
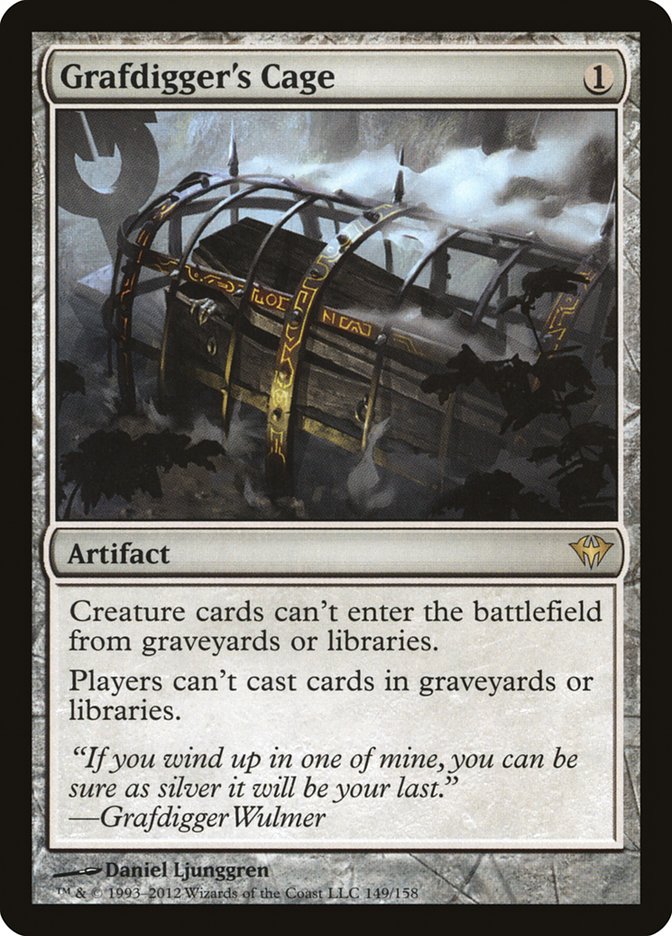
Bridge from Below and Greater Gargadon give you a way to win through the most commonly played hate card, Grafdigger’s Cage, which the other lists absolutely need to race to the battlefield or answer. The former is a risky proposition when Cage costs a mere one mana, while the latter leaves you on the wrong side of the threat-answer equation, which is problematic for a deck that rarely has more than four answers in the deck at one time.
Having the means to beat common hate cards without resorting to the sledgehammer of removing them from the battlefield is invaluable, as your opponents will often keep hands that would otherwise be mulligans on the strength of their sideboard cards, leaving you with plenty of time to assemble an alternate path to victory. With your lopsided advantage in most Game 1s, your goal really is to steal one of the post-sideboard games in any way possible, so leaving yourself with the most angles of attack is quite the advantage.
Second, the dependence of Bridge from Below on Greater Gargadon means that if you want to fully commit to the package, you need to find space for another sacrifice outlet or two. It needs to be able to operate on low mana, ideally costing two or less mana to cast and zero mana to sacrifice a creature, so you can effectively “go off” with multiple Bridges. A quick Gatherer search yielded the following options:

Of these four, Spawning Pit is the most attractive to me. It comes down before an opposing Anger of the Gods, lets you save your entire battlefield from the sweeper if needed, and provides some solid value going long. Still, all of these cards have the issue that they detract from the primary plan, so playing more than a copy or two is going to be difficult and potentially hurt the deck more than it helps it.
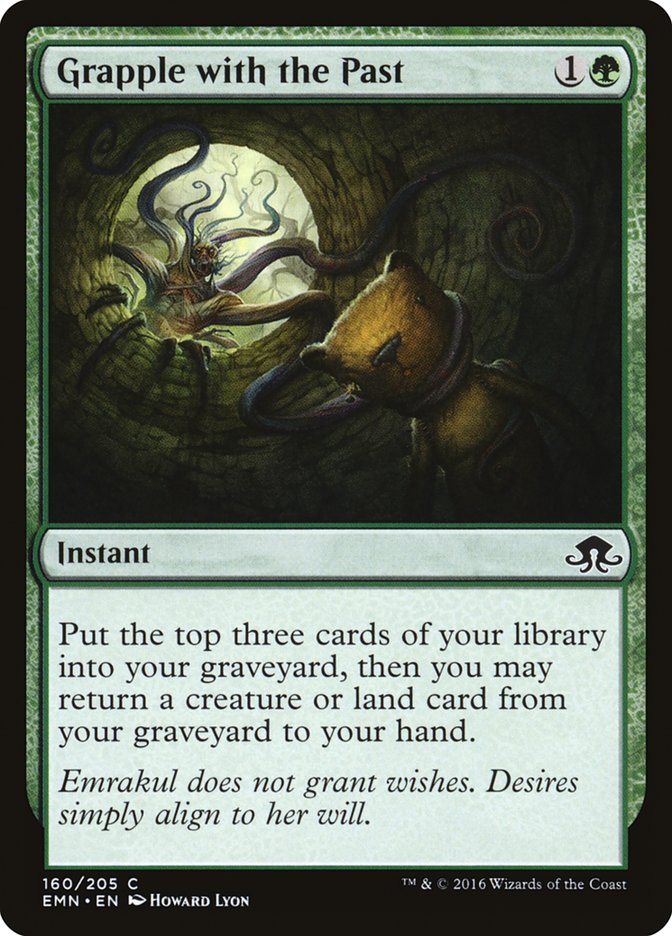
The solution I found that I like the most was suggested here by Reddit user Hanset74: Grapple with the Past. Grapple is a natural graveyard enabler that can rebuy a Greater Gargadon that has been dredged away or simply nab your critical third land drop. It isn’t quite as powerful as something like Life from the Loam, but the ability to enable the Gargadon-Bridge package may more than make up for that. This will be one of the first cards I try in the deck moving forward.
The Aftermath
My other major takeaway from the deck is that the discard outlets, Haunted Dead and Conflagrate, were excellent. You don’t have as many actual cards with dredge as previous versions of the archetype, so you will often find yourself unable to chain dredges very easily. In those scenarios, being able to discard your previously dredged cards, along with extra copies of Prized Amalgam, Bloodghast, and Bridge from Below, is invaluable.
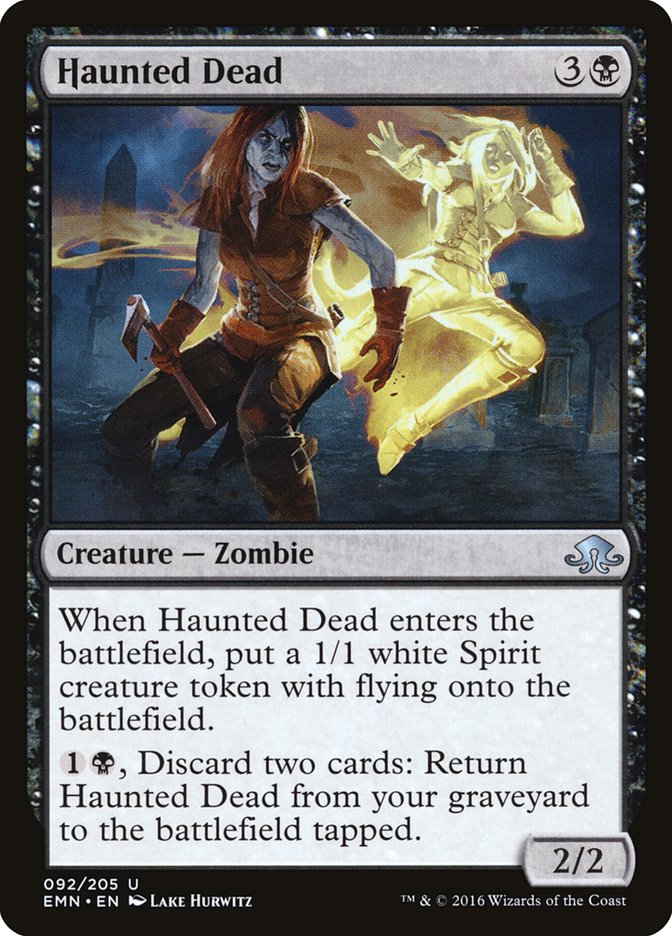
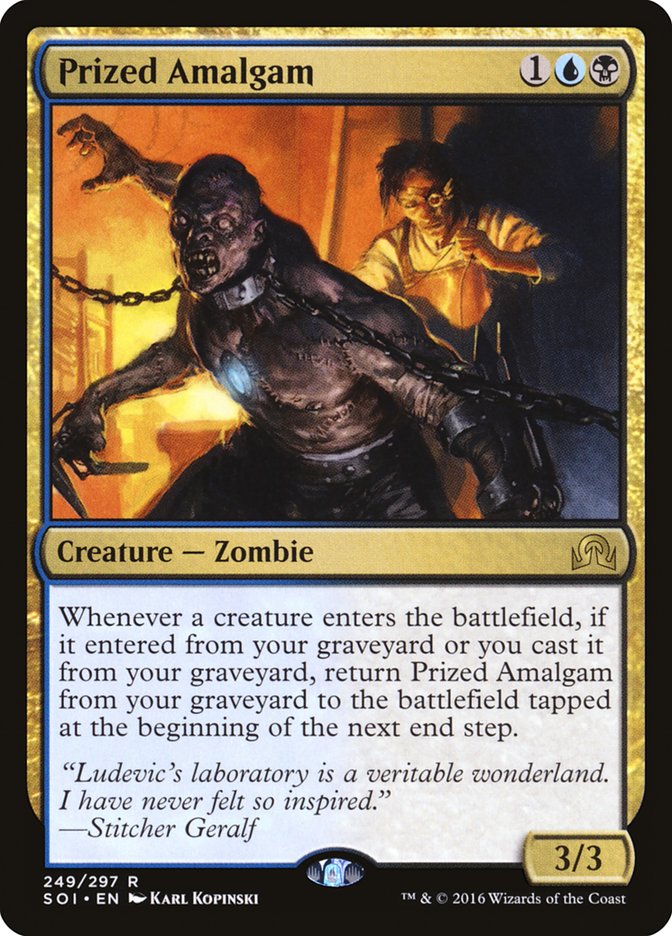
Haunted Dead has incredible synergy with Prized Amalgam and lets you discard at instant speed, so you can potentially discard a Golgari Grave-Troll or Stinkweed Imp on your upkeep to set up a dredge on your draw step or simply reload on your opponent’s turn following a sweeper.
Conflagrate is just much more powerful than I initially suspected. Even without Life from the Loam to fuel it, it was academic to cast it for three or four, which is more than enough to end the game a turn early or answer your aggro opponent’s initial threat or two, leaving you insurmountably ahead in the race. It also serves as an answer to creatures like Scavenging Ooze and Kalitas, Traitor of Ghet in Game 1. I was sideboarding in my second copy regardless of the matchup, and only playing one in his list was one of Todd’s greatest regrets from his tournament. It is the power of Conflagrate that is the strongest draw to playing a Bridge-less list and instead having Life from the Loam.
Moving forward, deciding how committed to be to Greater Gargadon and Bridge from Below is the most important decision, but close behind is my desire to completely overhaul the manabase. Because of the presence of Bloodghast, I expected fetch lands to be premium, but that interaction rarely came up, since you make so few land drops and can’t afford to leave a turn 2 fetchland uncracked.
The concern over dredging away every copy of a key shockland is relevant, but quite small. The real issue with the current manabase is how much unnecessary damage you take. Since you rarely need your fourth land drop, and if you do it is almost always to simply trigger Bloodghast, the Scars lands are essentially duals in this deck. I only played a single Copperline Gorge, and after the tournament I want the full eight copies of it and Blackcleave Cliffs.
With so few slots remaining, filling them with a smaller fetch-shock package isn’t viable, but we have access to Mana Confluence and Gemstone Mine as five-color lands to round everything out. I am looking at the following manabase:
1 Mountain
My list from Syracuse had seventeen red sources, twelve green sources, thirteen black sources, and ten blue sources. This manabase still has seventeen red, twelve green, and thirteen black while only having seven blue. However, I used one blue mana in the entire tournament last weekend, with Todd and Tom posting similar results, so lacking blue is hardly significant and the damage tradeoff is more than worth the exchange.
If it turns out we are even more worried about our own life total than our opponents’, then the Stomping Ground could become a Grove of the Burnwillows. Even though Dredge is an aggro deck, you aren’t often winning by small margins, so the trade could be worth it, but for now I’m sticking with the shockland.
With all of this said, I am currently favoring a version of the deck with Greater Gargadon and Bridge from Below. You want some copies of Gargadon anyway, since Anger of the Gods is going to increase in popularity and the fact that you can reasonably play two or three copies of Bridge from Below and still have the plan function means it doesn’t take up as much space as you might think. With that said, this is the list I’ll be starting with for my Invitational testing:
Creatures (29)
- 4 Golgari Grave-Troll
- 1 Golgari Thug
- 3 Stinkweed Imp
- 4 Greater Gargadon
- 4 Narcomoeba
- 4 Bloodghast
- 4 Prized Amalgam
- 4 Insolent Neonate
- 1 Haunted Dead
Lands (19)
Spells (12)
If you prefer to play a Bridge-less version of the deck, I would start here:
Creatures (28)
- 4 Golgari Grave-Troll
- 1 Golgari Thug
- 3 Stinkweed Imp
- 2 Greater Gargadon
- 4 Narcomoeba
- 4 Bloodghast
- 4 Prized Amalgam
- 4 Insolent Neonate
- 2 Haunted Dead
Lands (19)
Spells (13)
The last aspect of the deck I want to cover is its incredible level of mechanical complexity. Matthias Hunt and Ryan Overturn mentioned this on coverage a lot and Todd, Tom, and I all struggled to pilot the deck at maximum efficiency, falling well short of that mark and succeeding in the face of it. There is so much to keep track of, and so many variables to think about, that in addition to testing, I would recommend goldfishing as a means to acquaint yourself with the deck without having to worry about an opponent.
I certainly improved with the deck immensely from the beginning of the tournament to the end and was still making plenty of mistakes at the back end of the tournament. I would like to close with a brief list of mechanical tricks you can pull off with the deck and interactions to look out for:
1. When you are dredging on your opponent’s turn, usually by sacrificing Insolent Neonate, you most often want to do so on their second main phase; if you manage to hit both a Narcomoeba and Prized Amalgam, the Amalgam will return on their end step and will be free to attack on your turn.
2. If you already have a dredge card in your graveyard, wait to activate your Shriekhorn until after your draw step. If you find a Narcomoeba on the initial dredge, you can Shriekhorn in response to the trigger, find a Prized Amalgam, and have it trigger from the Narcomoeba. If you instead Shriekhorn on your upkeep, as is typically correct, you could find the Narcomoeba in those two cards, leaving any Amalgams you dredge later on in your graveyard.
3. When dredging from a Faithless Looting, any Narcomoebas you hit will only trigger once the Looting is finished resolving, so any Prized Amalgams in your hand can be discarded and then trigger off the Narcomoeba entering the battlefield.
4. If you have Insolent Neonate on the battlefield and Haunted Dead in your hand, you can sacrifice the Neonate, discarding the Haunted Dead, and then respond to the draw from Neonate by activating Haunted Dead and discarding a dredge card. This is because both sacrificing Neonate and discarding a card are part of the cost of the ability, while drawing a card is the effect. You pay costs first and then put the ability on the stack, at which point you will regain priority and have a chance to respond.
5. Prized Amalgam triggers off of other copies of Prized Amalgam. I missed this interaction in the finals, and I’m sure many times before that, to my own detriment. You won’t get the second Amalgam until the following end step, so it’s easy to miss. Be vigilant.
6. If you need more lands or a Greater Gargadon, casting Faithless Looting on turn 1 over a Shriekhorn or Insolent Neonate is best, even though you potentially miss out on dredges. If your hand is already made, I would sequence Shriekhorn first.
7. Sacrificing Insolent Neonate triggers Bridge from Below. Don’t miss out on free value.
8. Don’t be afraid to be aggressive in the face of hate, especially while on the play. Grafdigger’s Cage and Rest in Peace are ineffective when you already have nine or more power on the battlefield.
9. In a longer game, you can dredge Golgari Thug, cast it, and sacrifice it to Greater Gargadon in order to put Narcomoebas on top of your library and re-trigger them.
There is bound to be a significant increase in graveyard hate at the #SCGINVI this weekend, but we were all able to beat significant hate, ranging from Relic of Progenitus and Scavenging Ooze to Rest in Peace, Grafdigger’s Cage, and even Leyline of the Void. Dredge has always been a surprisingly resilient deck, much to the chagrin of its detractors, and the wide-open nature of Modern means that it’s difficult to commit too many sideboard slots to a single deck. As such, I believe that Dredge will continue to reward those who put the work into learning and tuning it.
Winning is nice, but come Monday morning you’re in the same place as everyone else. It’s time to hunt for title number five.