If there’s one thing you’ve noticed about M14, it’s that blue is all the rage. You’ve got people forcing blue so hard that they are taking Scroll Thief first pick over Serra Angel. While that pick might be a little bit extreme, blue is undoubtedly the best color in the set. But sometimes you aren’t in a position to have a great blue deck. It’s important to understand some of the top nonblue archetypes as well as what to be on the watch for in order to combat the blue powerhouse. In this article, I will discuss what I believe are the two best nonblue decks in M14 Limited and how to evaluate the most important cards in those decks.
B/R Sacrifice
The sacrifice deck is one of the most powerful decks in M14. It makes use of Act of Treason to gain control of your opponent’s creatures temporarily, attack with them, and then sacrifice them to one of black or red’s several sacrifice outlets to send the creature to the graveyard instead of back to your opponent while also producing some incremental value.
One great thing about this deck is that many of the cards are not highly desired by other archetypes. For this reason, you are able to spend your early picks on black and red’s premium removal spells like Chandra’s Outrage, Quag Sickness, and Liturgy of Blood. You can then spend your later picks on Act of Treason, creatures to fill out your deck, and, of course, “sacrifice” cards.
Here are the five “sacrifice” cards:

Altar’s Reap is the weakest of the sacrifice cards. While it’s obviously very powerful in combination with Act of Treason, it lacks in other areas. It can only be used once, which is a drawback. The effect of sacrificing Festering Newt can be very valuable; however, using it combination with Tenacious Dead only creates a combo that gives you effectively an Inspiration.
One good thing about Altar’s Reap is that it has very effective sideboard uses. Against blue decks with one or more copies of Claustrophobia, Altar’s Reap can put you ahead in the card advantage battle by sacrificing the creature that is targeted by the blue enchantment. This also holds true against white decks with Pacifism.
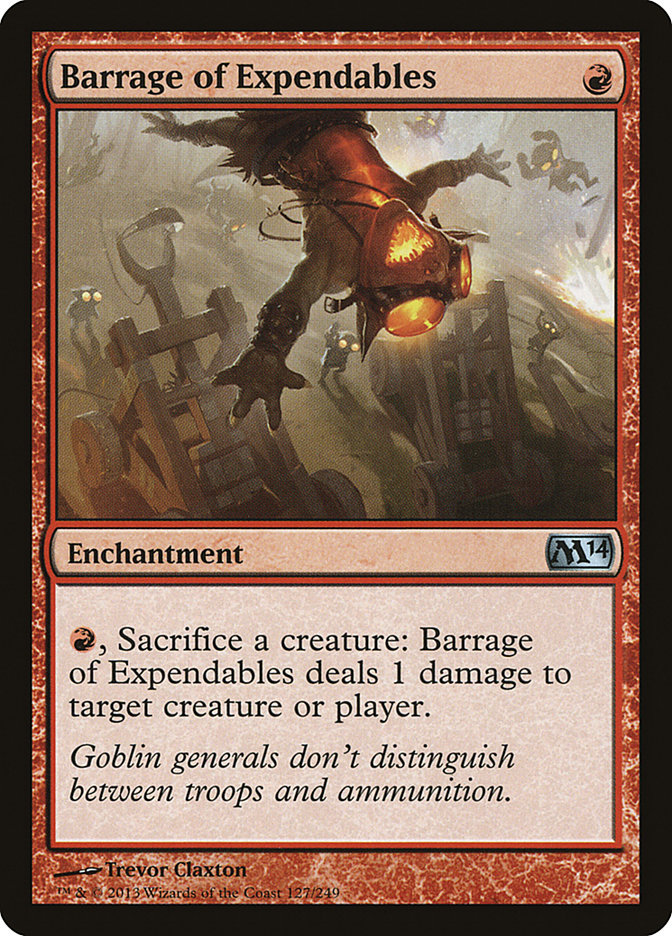
Barrage of Expendables is in my opinion the best of all the sacrifice outlets. It combines great with Act of Treason, and oftentimes in combination with Tenacious Dead or Molten Birth, it can prove to be unbeatable. One of the other advantages of Barrage of Expendables is that people are often unable to deal with an enchantment before sideboarding. Sometimes people maindeck a Naturalize, but that’s not too common and beyond that there’s virtually nothing. It combines very well with Pitchburn Devils to take care of a 4/4 that you couldn’t otherwise deal with like Sengir Vampire or Serra Angel.
One of the most important things Barrage of Expendables does is against the blue control decks. Oftentimes the blue decks are willing to take a lot of damage early in order to let the games go long while dealing with only your big threats. With Barrage of Expendables in play, their life total is much more at risk, and they are forced to be much more reactive to even your minor threats.
If they allow themselves to be nickeled and dimed early in the game, they are in danger of taking seven or eight damage in a single turn or an end of turn, untap, new turn sequence from the Barrage. This has the effect of causing them to use cards like Essence Scatter and Claustrophobia (which loses some effectiveness against Barrage anyway because of the ability to sacrifice the creature later) more aggressively, making it easier for you to present problem threats later in the game.

Blood Bairn has the advantage of being a pretty good card on its own. Even if you are not comboing it with anything, it is a 2/2 body for three mana with a relevant ability. It works nicely with Act of Treason, often getting an extra two damage in before sending their creature to the graveyard. It is also a very potent combination with Molten Birth. But easily the best combo with Blood Bairn is Tenacious Dead. With Tenacious Dead in play, Blood Bairn has the text “1B: Blood Bairn gets +2/+2 until end of turn.” This effect is exceptionally powerful. If you’re protective of your Tenacious Dead, Blood Bairn will need to be dealt with fairly quickly or will end the game.
Unfortunately, blue, white, and black all have common and effective ways to deal with Blood Bairn. Claustrophobia, Pacifism, Quag Sickness, and Liturgy of Blood all do a good job. The upside to this is that if you are able to turn a card like Blood Bairn into a powerhouse that causes your opponent to use their best removal spells, you are in a good position to stick a very powerful threat later in the game. Also, although Pacifism and Claustrophobia are able to prevent Blood Bairn from going crazy with help from Tenacious Dead, those cards still don’t prevent it from being used as a sacrifice outlet for Act of Treason.
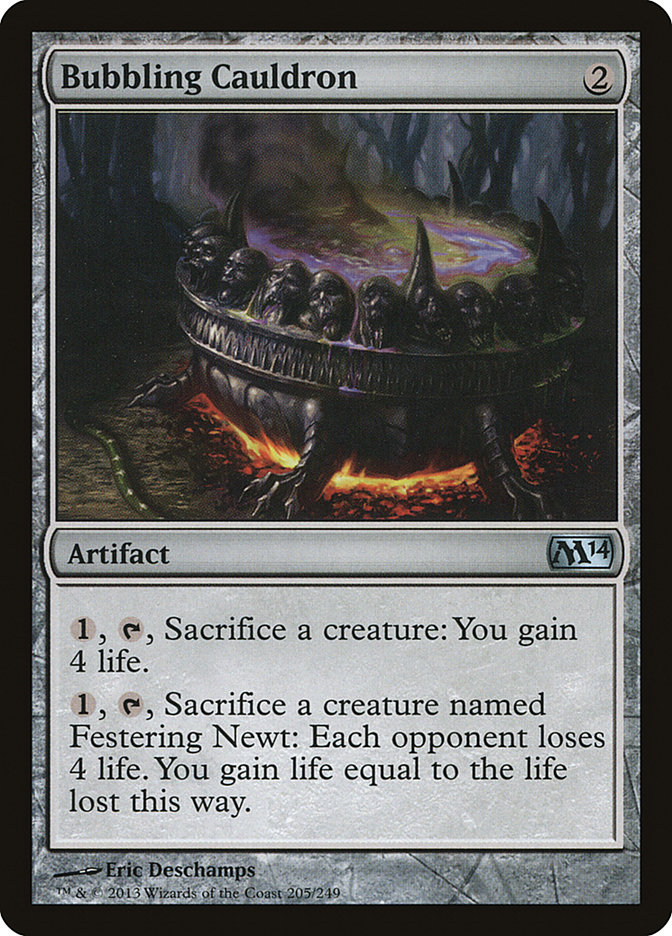
Bubbling Cauldron is a good card to play in your deck in two instances. The first, of course, is when you have multiple copies of Festering Newt or if you’re lucky enough to acquire the entirety of the Lion (Festering Newt), the Witch (Bogbrew Witch), and the Wardrobe (Bubbling Cauldron). This is an extremely effective and potent combo.
The Witch’s ability to search out Newts even if you aren’t sacrificing them to the Cauldron is extremely powerful. Considering our goal in this deck is to have multiple sacrifice outlets, if you are searching out Newts at instant speed and sacrificing them to literally anything to give a creature -4/-4, you have it made. Throw in the Cauldron and you’re gaining the effect of Soul Feast with every Newt. In reality, it’s hard to get all three and to get the combo fully online, but any two of the three make for a pretty nice addition to the deck.
Bubbling Cauldron as a standalone can be okay as well. It is not be one of the better sacrifice outlets, but it definitely still has applications. Sometimes you just aren’t able to get as many sacrifice outlets as you’d like. I recommend about four to go with multiple copies of Act of Treason. In case you come up short, you might want to have Bubbling Cauldron in your deck just for that purpose. If you get lucky and get an unusually high number of Act of Treasons, four or more let’s say, you might want to have an extra sacrifice outlet just to make sure you draw one. Also, Bubbling Cauldron is a reasonable combo with Tenacious Dead, which you are aiming to have in your deck anyway, to gain four life per turn.

Vampire Warlord is a “sacrifice” card only as a technicality. What I mean by this is that although he has an ability to sacrifice a creature, you aren’t really gaining any value from it other than just the sacrifice itself (again, with Act of Treason). It isn’t producing any value with Tenacious Dead, and you are usually better off sacrificing creatures to any of the other cards.
What Vampire Warlord has going for it is that it can be a reasonably powerful card on its own (Obviously you need some other creature with it for it to be powerful, but it doesn’t have to have any kind of synergy with it). When I evaluate Vampire Warlord for my deck, I think of it first as a five-mana 4/2 that can regenerate. Oftentimes this is enough to include it in my deck. When you add on the bonus of being able to use it as a sacrifice outlet, that’s usually enough to put it over the top in these decks. If your deck is great, you have plenty of other sacrifice outlets, and you think there are better options, don’t be afraid to leave it on the bench.
G/R Aggressive
M14 Limited is a different format than we are used to as of late. So while the G/R deck is very powerful, you have to draft it quite differently than the aggressive decks in Return to Ravnica Limited. In Return to Ravnica Limited, aggressive decks relied on overpowered and underpriced creatures to overwhelm the opponent before they had a chance to mount a substantial defense.
In M14, your “aggressive” deck is going to be built on the back of brute force. The best creatures are mostly large creatures that dominate the board and are difficult to deal with. There are very few powerful one- and two-drops in M14, with a few notable exceptions. In addition to great creatures, you get access to all of the red removal spells (Chandra’s Outrage > Flames of the Firebrand > Volcanic Geyser > Shock).

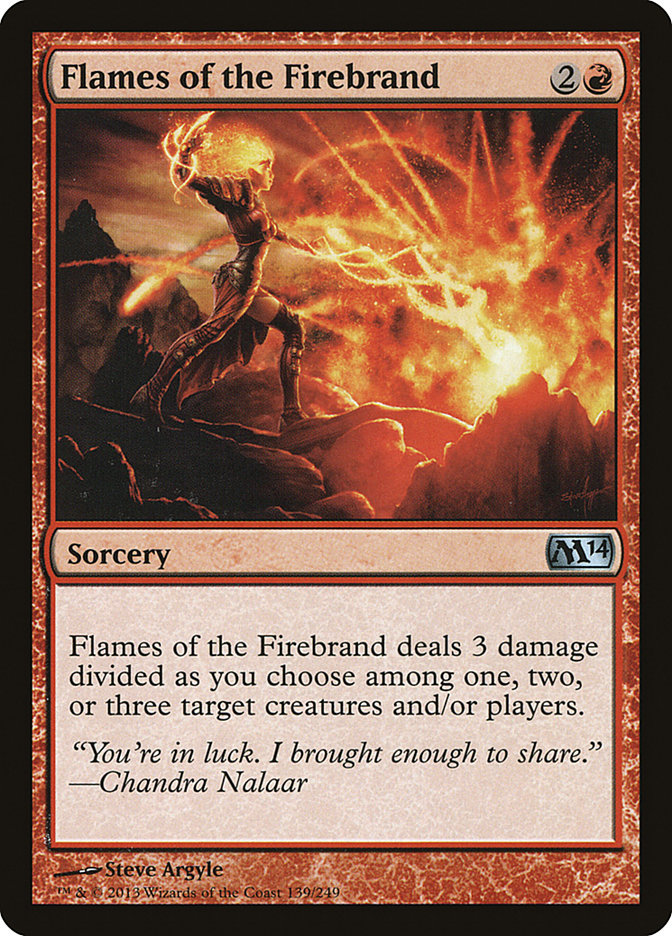
Thought I was just going to proclaim Chandra’s Outrage was better than Flames of the Firebrand and move on?
Flames of the Firebrand is a great card; there’s no denying it. It also has some very significant advantages over Chandra’s Outrage. It’s one mana cheaper, it only costs a single red mana, and in some cases it can kill multiple creatures, creating a blowout scenario. One of my major issues is that in M14 these “blowout scenarios” aren’t even that much of a blowout. The one-toughness creatures, with very few exceptions, are not that good or important. I typically don’t like to play cards such as Coral Merfolk, Child of Night, and Goblin Shortcutter in my deck since they’re just too low impact. Enough of the two- and three-drops have three toughness and completely shut them down—Coastal Drake, Advocate of the Beast, and Gnawing Zombie to name a few.
Beyond that, there are a lot of very high quality four-toughness creatures. Serra Angel and Sengir Vampire at uncommon are two of the better creatures in the set. Rumbling Baloth at common is a great card and sometimes difficult to get through with your own G/R deck. Another factor is often you are going to end up spending either spell on a card like Air Servant. Flames is cheaper and easier to cast. Outrage, however, is an instant. Also, if you’re casting a three- or four-mana spell on turn 5, you are very often not casting another spell in either case anyway. Lastly, while it doesn’t add tremendous value, the two damage it does to your opponent is not irrelevant.
For now, if I’m heavy red, I’m selecting Chandra’s Outrage. If red is my splash, I will still take Flames of the Firebrand. I do think it’s very close and could see learning that I’m mistaken.
Now that that tangent is over, here are a few of the key cards other than the red removal spells for a G/R deck in M14:
Kalonian Tusker
Kalonian Tusker is the best two-drop in M14 by a fairly wide margin. There is not a single other creature in the entire format that costs two or less with a power of three or greater. This alone makes him a backbreaking turn 2 play. In addition to that, there is only one non-rare creature with the casting cost of three that has a power of three or greater and thus is able to trade with the Tusker (Regathan Firecat). Add in the fact that Kalonian Tusker is a Beast and combos well with Advocate of the Beast and you have what I believe to be the best non-rare green card in M14.
Elvish Mystic
Elvish Mystic is extremely powerful in this format. Because most of the other turn 1 and 2 plays are weak, the Mystic does just what you want to do. It allows you to start playing your three- and four-drops earlier. Elvish Mystic can be difficult to rate in a pick order because often you are choosing between it and the cards you are hoping it accelerates you into. I’ll generally take the first Rumbling Baloth over the first Elvish Mystic. After that, I’ll start alternating them. I’ll begin taking Rootwalla over Elvish Mystic when I have two more Elvish Mystics than I do Rootwallas.
Elvish Mystic is one of the most important cards to draw against blue control decks. If you’re on the play, you’re able to get a three-drop into play before they’re able to cast Essence Scatter. This creates a major problem for them. They need to tap out in order to deal with the cards you already have in play, which makes their counterspells even less effective. On the draw, it’s not quite as good, but it still allows you to get three-drops in play if their counterspell is Cancel rather than Essence Scatter. Also, when the blue deck is on the play, they are often able to get a Seacoast Drake or some other creature in play depending on their other color on their second turn while leaving their counters up for your third turn. Elvish Mystic prevents them from being able to do that.
Rumbling Baloth
Rumbling Baloth is the cornerstone of the G/R deck. I take it over all the other commons except for Chandra’s Outrage and alternate it with Elvish Mystic as discussed above. Four mana for a 4/4 in M14 is a bargain, and if it’s cast on turn 4, it will always be the biggest creature on the table. Oftentimes when opponents don’t have removal spells readily available to deal with the Baloth, they will be forced to make double blocks and open themselves up to two for ones. It’s also another Beast that combos with Advocate of the Beast.
Rootwalla
Rootwalla acts a bit like an evasion creature. You play it on turn 3, and then when you attack on turn 4, your opponent often can’t block because of the threat of using his pump ability. After it actually goes unblocked, though, you can decline to use the pump ability and continue to develop your board. As the game goes on and you start to have mana to spare, you can actually begin pumping the Rootwalla and get in for extra damage.
Rootwalla’s major weakness is that its pump ability can only be used once per turn. What this means is that a savvy opponent is able to make a block that forces you to use the pump ability and then respond with cards like Shock or Celestial Flare, gaining major tempo. All things considered, Rootwalla’s upside is big enough to make it the best three-drop in the G/R deck.
Marauding Maulhorn
A 5/3 for four mana, Marauding Maulhorn is another powerful four-drop Beast that will generally make it into all your G/R decks. The three toughness makes it a little weaker than Rumbling Baloth alone. It also comes with a decent drawback that it must attack every turn if you don’t control Advocate of the Beast. This actually turns out to hurt you more than you’d think. Sometimes you just want to have a creature on defense. Often it forces you to make a trade you don’t want to make, like with something such as Messenger Drake. And in rare cases, it can make you to send it into an opposing Minotaur Abomination or a double pumped Capashen Knight to its death with no gain at all.
For all these reasons, I generally don’t select Maulhorn over any of the other cards we’ve already talked about.
Advocate of the Beast
As a 2/3 for three mana on his own, the Advocate is not very exciting. However, in combination with other Beasts, if left unchecked it can really put the game out of reach very quickly. The fact that its power is reliant on other cards can make deciding when to draft it very difficult. Kalonian Tusker and Rumbling Baloth are both so powerful that I would need a very large number of them before I’d consider taking the Advocate over them. Marauding Maulhorn vs. Advocate of the Beast is a closer pick, and although I’d generally take the Maulhorn, if your Beast count is high and you are lacking in Rootwallas at the three-drop position, I could definitely see taking the Advocate.
Giant Growth
At first I thought Giant Growth wouldn’t be as good in M14 as it has been in other formats because your creatures tend to be so big already. What I’ve found in practice is when you cast Rumbling Baloth, the opponent’s best course of action is often to try to double block him with two smaller creatures. Giant Growth is very effective in this situation since it only sets you back one mana to get through their weenies and thus enables you to continue developing your board. Also, because of Marauding Maulhorn’s drawback, people often assume you’re attacking because you are forced to attack and are less wary of the Giant Growth. This makes it more effective. It’s also effectively a one-mana counter in most situations against red creature removal spells.
Academy Raider
I wanted to mention this card, not because I think it’s a great card but because of its sideboarding applications against blue control decks. I’ve found this card does very well against the controlling blue decks. The blue deck’s game plan is often to just overpower you with card advantage by using cards like Divination and Opportunity to fill their hand with cards and deal with all your threats on a one-for-one basis.
While Academy Raider doesn’t actually gain you any cards in quantity, what it does do is improve your cards in quality. If you’re able to successfully connect with Academy Raider, you get to discard lands or non-threatening cards to dig into your deck to find the cards that are going to have a large impact on the game. Even if they’re trying to overpower you by drawing extra cards, it’s harder for them to keep up if you are effectively not drawing lands by “looting” through one every turn.
You’ll notice that between blue and the two decks I’ve talked about today, there’s a distinct lack of white cards in this article. Unfortunately—or fortunately depending on which side you’re on—white only has one premium common in Pacifism and is very shallow beyond that. This makes it hard for a table to support too may white drafters, especially if very few powerful white uncommons and rares are opened. When I head to Grand Prix Oakland this weekend, I’ll be avoiding white unless I’m given a very good reason not to like opening Ajani, Caller of the Pride.
Whether your next event is a PTQ or Grand Prix Oakland like myself, remember that blue is the best color in M14 but there are ways to go about beating it. White is too often simply not one of them. I hope this article will help you in your next event. If you see me at Grand Prix Oakland this weekend, feel free to say hello. Thanks for reading!