
The time has finally come. You’ve been preparing for this tournament for weeks, jamming endless games of Magic against all the top decks. For the first time in your career, you’ve decided to bite the bullet and are playing the de facto best deck of the format, Grixis Death’s Shadow. Everyone says the deck is hard to play, and it is, but you’ve put the time in. You’re ready.
But things don’t always go according to plan. You knew Death’s Shadow had a target on its head and you knew the field would be ready for the deck, but you didn’t think being ready would look quite like this:
Creatures (26)
- 4 Noble Hierarch
- 3 Qasali Pridemage
- 4 Leonin Arbiter
- 4 Mirran Crusader
- 2 Scavenging Ooze
- 2 Thalia, Guardian of Thraben
- 4 Loxodon Smiter
- 2 Voice of Resurgence
- 1 Brimaz, King of Oreskos
Lands (22)
Spells (12)

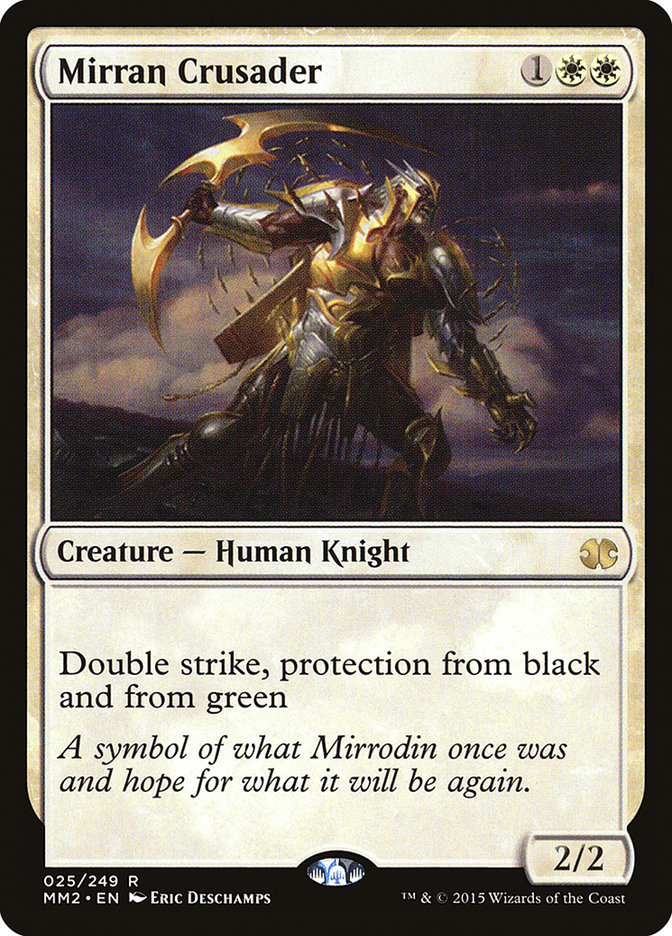
After playing against this deck twice in the tournament, you’re about ready to call it quits on Death’s Shadow. Never again do you want to experience the sinking feeling of watching them deploy a Mirran Crusader on turn 3 and knowing that you can do nothing about it. How are you supposed to be able to beat a permanent you can’t interact with?
This is haymaker Magic. When a deck rises to the top, it’s inevitable that people will try to knock it down. Early efforts to topple a deck generally center around single cards that are uniquely problematic for the targeted deck. These haymakers are the early focus because their effect on the game is so obvious. The first time you watch a Mirran Crusader shut down Grixis Death’s Shadow, it’s only natural to start thinking about how you can reach this game state more consistently. Haymakers are certainly not subtle, but that doesn’t make them any easier to beat.
Building Around Haymakers
So you’ve identified a haymaker you want to play with. Congratulations! Your days of losing to the format’s best deck are nearly over. All that’s left is to figure out the cards you’re going to play alongside it.
Well, it turns out this last step isn’t actually all that easy. A deck rising to the top in the first place requires a metagame where the cards that prey on it don’t see much play. Often, the cards that qualify as haymakers in the fight against a top deck aren’t particularly good Magic cards. They have a niche, and the time is right for that niche to be filled, but finding the right cards to surround them is no simple task.
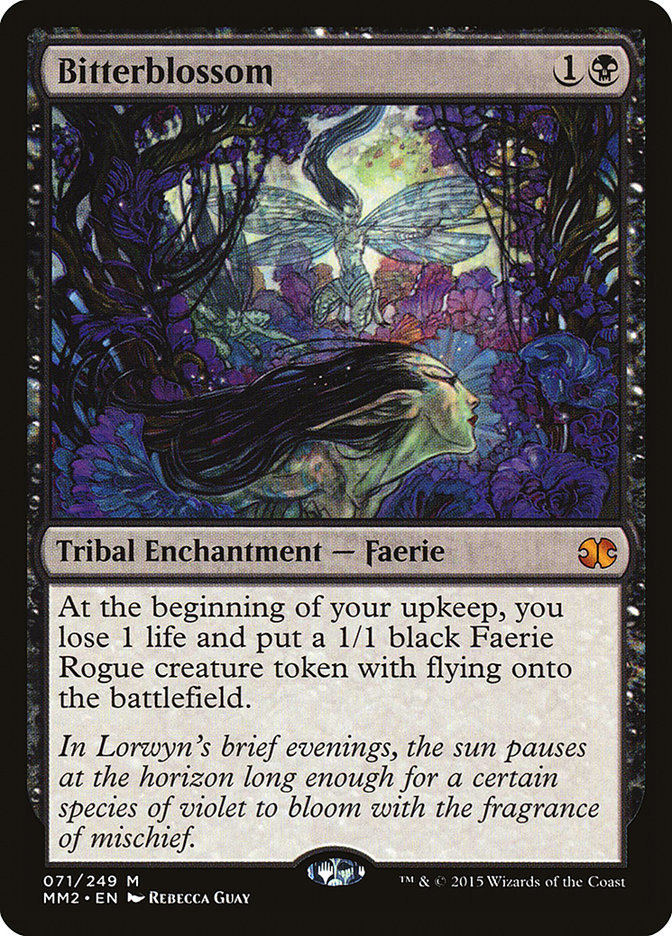
In almost every case, you want to play four copies of your haymaker. If it’s worth going to the trouble of building a deck around, it’s worth playing the full four copies. But these haymakers are often strange enough Magic cards that finding a deck that can support four copies is no easy task. For instance, Bitterblossom is a card that has popped up a lot in discussion lately as being quite good against Grixis Death’s Shadow. Chump blockers are good against Death’s Shadow, and flying is an excellent keyword against the deck. But very few decks can just play four copies of Bitterblossom. In fact, I can only think of one…
Creatures (9)
Planeswalkers (4)
Lands (24)
Spells (23)
Sometimes everything just falls into place. You think Bitterblossom is good right now, so go play Faeries. Done. But what about when your haymaker isn’t the centerpiece of a known archetype?
First, you need to have a good understanding of the axis your haymaker is winning on. You want to surround it with cards that fight on that same axis. Maybe U/W Control with four Mirran Crusaders jammed in would be a huge favorite against Grixis Death’s Shadow, but those four Mirran Crusaders are just actively making your deck worse against the rest of the field. As badly as you want to beat the top deck, you still have to have game against the rest of the field, and that means you need to ensure your cards are all working towards the same goal. Mirran Crusader is an aggressive white card, so you want to put it in an aggressive white deck. Enter Hatebears, enter Craig Wescoe, and exit with a GP Top 8 berth.
But what about when you’re sitting on the other side of the table? For every person out there desperately trying to beat down the top deck, there’s someone else doing everything they can to keep that deck on the top of the heap. If you want to keep playing Grixis Death’s Shadow, what can you do to be ready for all these haymaker-based decks?
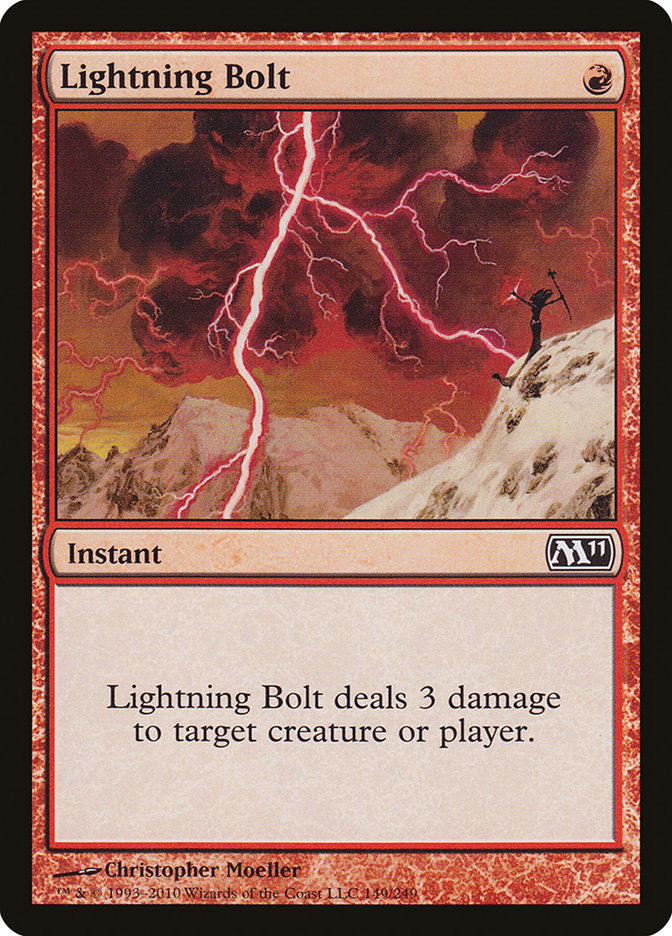
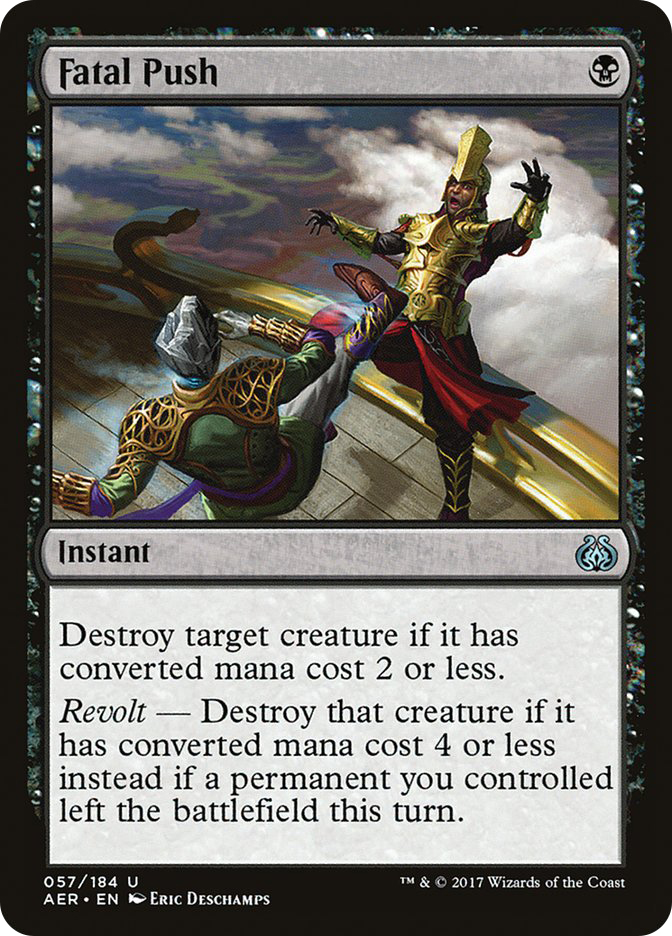
You might not like this first piece of advice, but it’s important: don’t overreact.Coming off a weekend like Grand Prix Las Vegas, where no copies of Grixis Death’s Shadow made Top 8 but two copies of Hatebears did, it’s very tempting to skew your deck to be able to beat Mirran Crusader. For instance, you could cut all the Fatal Pushes and replace them with Lightning Bolts. Mirran Crusader wouldn’t be a big deal then.
Don’t do this.
Overreacting will weaken your game against the rest of the field. Fatal Push has been played over Lightning Bolt for a reason, and just because one deck pops up where Lightning Bolt would be better doesn’t mean you need to abandon ship. These slightly off-the-wall haymaker decks are designed to prey on you. It’s unnerving to be the prey when you’re used to being at the top of the food chain, but you have to just let it happen. That’s not to say, however, that you must sit back and accept your fate like a good little grazer.
The sideboard is where you want to shore up your weakness to these haymaker strategies. Even there, you can’t afford to devote too much real estate to beating a deck you might see once or twice across the length of the tournament. To this end, simply putting answers to their haymaker in your sideboard is not the solution. They have four copies of their haymaker and you can’t afford to sideboard even four answers, let alone more. Mathematically speaking, if sideboarding two answers to their four-of is your solution, you can’t expect to become favored in post-sideboard games.
Instead, what you’re really looking for is a card that can turn the game on its head, that modifies your gameplan in such a way that you can beat their haymaker. A card that trumps the angle that the haymaker is attacking you on. These cards are hard to find, but supremely powerful when you do.
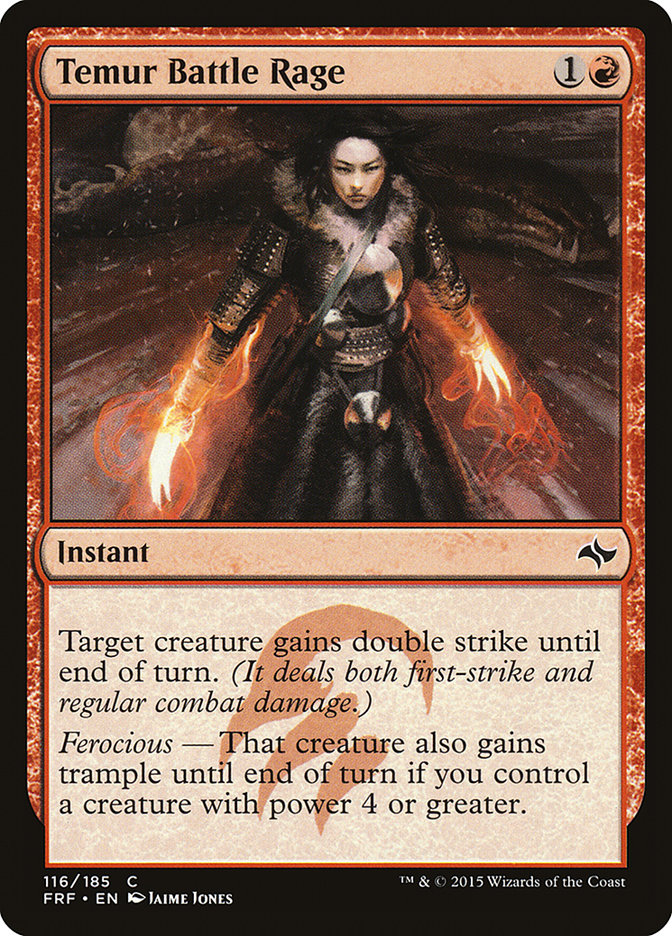
Grixis Death’s Shadow may not have made the Top 8 of Grand Prix Las Vegas, but we did get to see some lists from the Top 32. Both Brian Braun-Duin and Oliver Tiu incorporated Temur Battle Rage into their Grixis Death’s Shadow decks, and were rewarded by being among the top-finishing Death’s Shadow pilots.
All of the anti-Death’s Shadow haymakers revolve around blanking the Death’s Shadow threats in combat. Bitterblossom and Lingering Souls create chump blockers; Mirran Crusader has protection from black. The other part of these haymakers is their ability to turn the corner and finish the Death’s Shadow pilot off quickly, but Temur Battle Rage nullifies that part of their gameplan by trumping the blocking plan. Drawing one Battle Rage is enough to win the game, no matter how many copies of their haymaker they drew.
But technology is only a small part of the fight against haymaker decks. Far more important is just understanding what their overarching strategy is and learning how to play against these decks. Haymaker decks are generally rogue decks, and their pilots are gaining an advantage from your unfamiliarity. It’s bad enough that they have a card that is uniquely potent against you, don’t make it worse by not knowing how to play against them. Don’t focus so much on their haymaker, either; learn to play against the deck as a cohesive unit.
Slotting In Haymakers
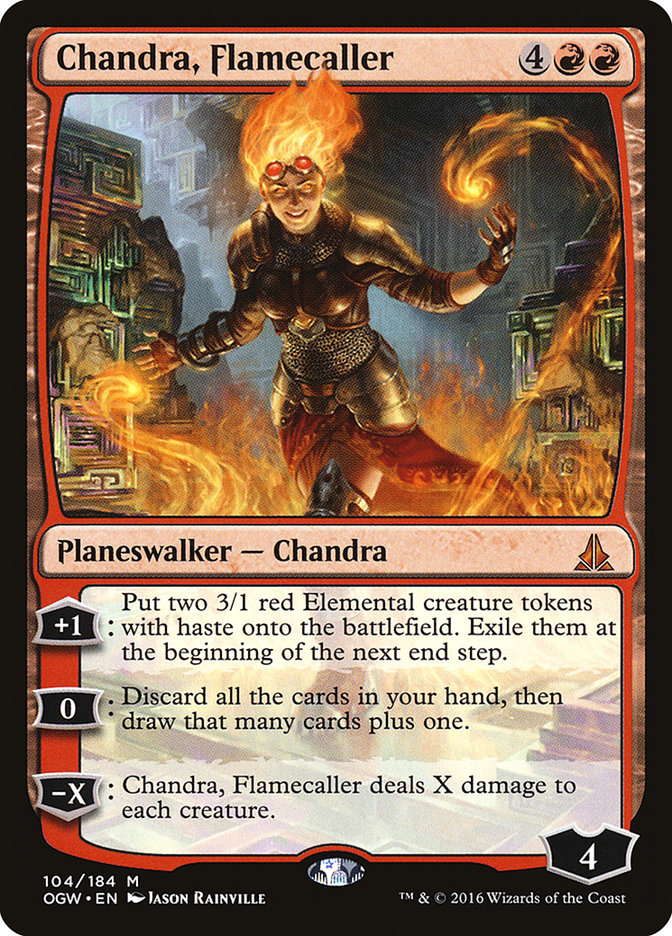
Haymakers in Magic follow a standard progression. First, a deck somewhat built around one will dominate a tournament, kicking the best deck down a peg. Everyone will talk about how good the haymaker is, and people will start to play them in other decks that aren’t built around them. At Pro Tour Amonkhet, Team Genesis did very well with an Aetherworks Marvel deck that utilized Chandra, Flamecaller as an anti-Zombies haymaker. Fast forward a month, and Chandra, Flamecaller was everywhere. U/R Control, Temur Energy, the archetype didn’t matter; if it had red mana, it had access to Chandra, Flamecaller.
After Grand Prix Las Vegas, I believe this to be the stage of the format we’re in. I expect to start seeing Mirran Crusader as a two-of in Abzan decks. Bitterblossom in the sideboard of Grixis Death’s Shadow for the mirror. A sprinkling of Lingering Souls in places we don’t usually expect to find them. Magic players love playing powerful cards that go a long way towards shutting down popular strategies, and these cards fit that bill in the current Modern metagame.
Sometimes doing this is a good move, but often it’s not. Context is everything in Magic, and taking a powerful haymaker out of the context it was powerful in and dropping it into a new one is far from guaranteed to work out. Like we talked about before in building around haymakers, it’s really important that the goals of the haymaker and the goals of the deck align. Haymakers are a lot easier to beat when they have no backup on the path they tread.
Still, whether Mirran Crusader Abzan is an objectively good idea or not won’t matter very much to you when you find yourself sitting across from it. You should expect to be surprised by the haymakers with buzz often, and you should be prepared.
That’s more like it.
This is where we start to consider playing some number of answers. Trying to answer a four-of from a devoted deck with a one-of isn’t realistic, but when we have reached the point where haymakers are being thrown into established decks, diversification starts to make a lot more sense. You will face haymakers out of decks that aren’t playing the full four copies. Drawing your one answer can actually win you the game, and often will.
As a brief aside, diversification in general is a great idea when you are trying to play the best deck into a field you expect to be prepared for it. Playing more one-ofs objectively makes your deck worse, as you aren’t playing the best cards, but it gives you more options. People prepare for the stock lists, and any little wrinkles you throw at them can go a long way. Don’t use this as an excuse to go crazy and play highlander Death’s Shadow, but minor diversification is completely defensible when playing a deck into a prepared field.
So diversify in ways that give you outs to haymakers. What else can we do to be ready? Card- and technology-wise, nothing. Just like when thinking about devoted haymaker strategies, overpreparing is the enemy. Devote too much to beating what might be a two-of in their deck, and you’ll find yourself losing to their four-ofs. You play Lightning Bolt so you can beat Mirran Crusader out of the Tarmogoyf deck, and you find yourself losing to Tarmogoyf. Whoops.
But there are things to be done yet, just not in deckbuilding. We can always learn new ways to extract more value from the cards we have, ways to beat haymakers with cards that can’t touch them. Sometimes the direct approach is not the best. Sometimes, you just need to dodge.

Dodging Haymakers
And no, I don’t mean “dodge” like “cross your fingers and hope to not get paired against a Mirran Crusader.” You see, beating cards that you can’t interact with is a Magic skill near and dear to my heart. My first competitive Magic success was with Mono-Black Devotion in a world of Blood Baron of Vizkopa. My innovation was to cut all the ways to deal with Blood Baron. I had no answers to a resolved Blood Baron, and I was comfortable with that. You don’t always need to be able to go toe-to-toe with their haymakers.
The first step in learning how to beat a card you can’t interact with is to beat it. What? Play enough Magic, and crazy things happen. I guarantee that if you jam a bunch of games against a deck that has a card you can’t interact with, eventually you will find a way to win despite that card being on the battlefield. Often that will involve things going horribly wrong for your opponent. That’s okay. Just take note of how you managed to win through their card.
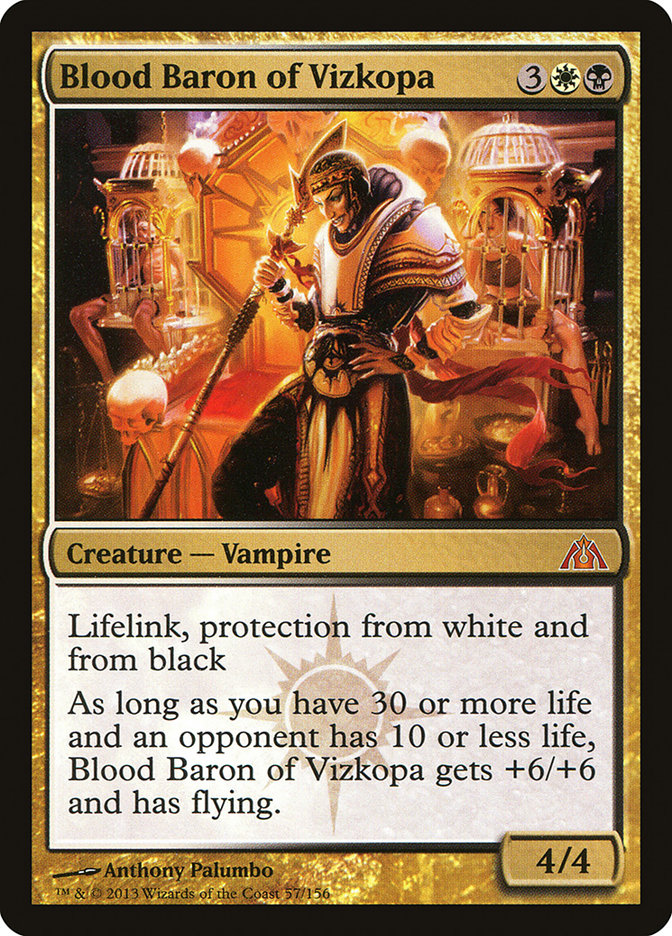
For Blood Baron of Vizkopa, my aha moment came in a game where I had two Desecration Demons and their Blood Baron wasn’t able to race. Far from intuitive that a four-power creature with lifelink and protection from my deck would be raceable, but it was. Once I realized that racing was the path to victory, finding that path got easier.
Common wisdom was that black mirrors were about card advantage. When they had the white splash, I started to make some strange plays: Desecration Demon over Underworld Connections on turn 4, things like that. Racing a possible Blood Baron was always in the forefront of my mind.
And that right there is the key. You can’t just start thinking about how to beat a haymaker after they cast it. You need to be thinking about that possibility from the start of the game and engineer your whole game plan around winning through it. These cards are far too powerful for gameplans concocted at the point they enter the battlefield to have much chance. That’s why it’s so important to know what the games where you beat these cards look like, so you can start maneuvering towards that game from the very first turn.
Mirran Crusader has been our primary example since the beginning, so let’s continue on that path. How can Grixis Death’s Shadow beat a resolved Mirran Crusader? For the sake of argument, we’ll assume that Lightning Bolt is not in our list. What do the games where we win anyway look like?

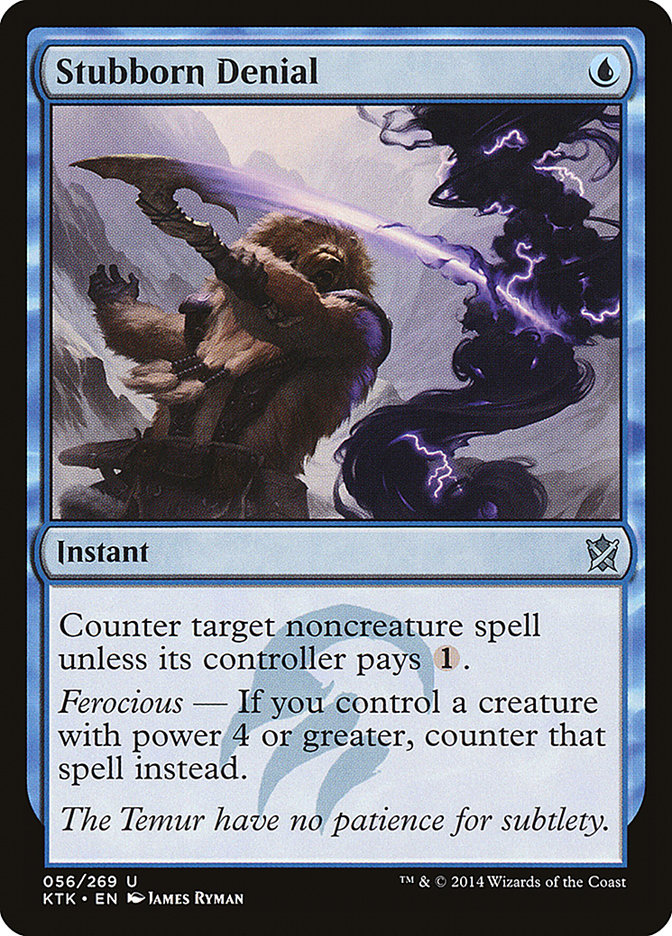
For starters, we need to populate the battlefield with at least two threats. A defensive Mirran Crusader blanks one threat entirely, so we will need two to get any damage through. These Mirran Crusader decks still have removal, so finding and deploying as many threats as possible is critically important. Keep as many as you can off Serum Visions, and go through extra pains to protect them from Path to Exile with Stubborn Denial.
The next obstacle in these games is not dying. Mirran Crusader can turn sideways at any moment and four us, which wouldn’t be a huge problem for a non-Death’s Shadow deck. But we’re playing Shadow, so four damage is a big deal. We can’t safely attack with a Death’s Shadow into a Mirran Crusader until we get down to eight life, so from the point where we have profitable attacks, we are at most two Crusader connections away from death. Once you hit that eight-life point, not taking any extraneous damage is very important.

Snapcaster Mage can chump block Mirran Crusader, and that fact tends to play a very large role in winning these games. Generally, the games we win are slow. Protecting and developing two threats is non-trivial, and once we get to that point, we are only getting in for four or five damage a turn. We need to buy time, and Snapcaster Mage gives us that. It also lets us pull ahead on cards and deal with their other permanents, which we can’t afford to let hit us.
Find the strategies, find the tactics, and most importantly don’t despair in the face of a haymaker. These cards are beatable, whether they appear to be or not. Effectively dodging these cards is challenging, but finding ways to consistently do so is one of the most rewarding feelings in Magic.