Last week, I wrote about finally finding a deck in Pioneer which I both enjoyed playing and could compete at the top echelons of the metagame in Abzan Rally. The deck repaid my faith in it in full on Sunday, as I took down the Pioneer Challenge with it, including a clean 6-0 sweep of the elimination rounds.
Creatures (32)
- 4 Cartel Aristocrat
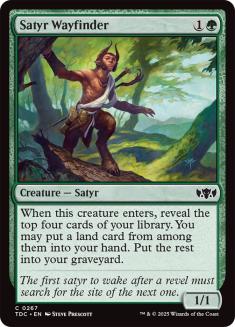
- 4 Satyr Wayfinder
- 1 Blisterpod
- 4 Zulaport Cutthroat
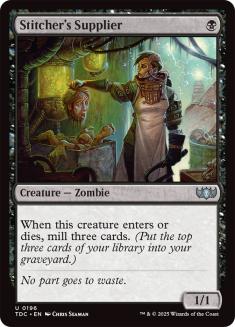
- 4 Stitcher's Supplier
- 4 Hunted Witness
- 4 Priest of Forgotten Gods
- 2 Cruel Celebrant
- 4 Fiend Artisan
- 1 Drannith Magistrate
Lands (20)
Spells (8)

Last week’s article focused heavily on the construction of the deck, including my reasoning behind some of the unique choices, so I encourage you to look at that if you’re unclear on any aspect of my specific list. This week I want to focus more on the gameplay, because on the surface it looks straightforward, but in practice it’s much more subtle.
The synergies in Lurrus Abzan Rally are obvious. You play creatures that sacrifice other creatures and creatures that provide value when they’re sacrificed. Ideally you can assemble those creatures in a large enough quantity that you can end the game fairly quickly — this list can kill as early as Turn 4 in reality, Turn 3 if you live in Magical Christmas Land. Knowing that, you’d think that the major skill tested when playing with Lurrus Abzan Rally is maximizing those sacrifice synergies and sequencing to fill your battlefield as quickly as possible while not making yourself too vulnerable to opposing disruption.
This kind of tactical min-max play is certainly tested, but the more important skill requires thinking with a bigger picture in mind and fitting your tactics to the appropriate strategy for a given game. This aspect of the deck is what I’ve found endearing, since I enjoy the problem of diagnosing how the game is going to play out, devising a plan of how to win such a game, and playing to that outcome as best as I can.
Broadly, games with Lurrus Abzan Rally play out in three different ways
1. Rally the Ancestors games
2. Return to the Ranks games
3. Non-Graveyard games
Navigating each of them is different, and sometimes you have to change gears midway through because of opposing disruption or an unforeseen sequence of draws, so it’s critical that you not lock in on a plan too strongly and adjust if the game dictates.
Rally the Ancestors Games
This is the kind of game you’re hoping to play, since it’s the least interactive. Generally, if you’re executing it successfully, then you get to ignore most of what your opponent is doing. But it’s also the gameplan that is most susceptible to graveyard hate, counterspells, and other forms of disruption, so you need to be confident your opponent is short on disruption to execute it. As a result, these games happen more often before sideboarding. It’s also your ideal plan against opposing combo decks because it’s your best chance to race.
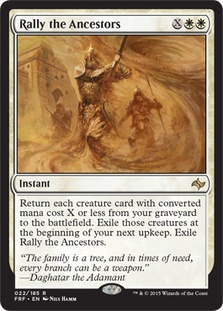
With Rally the Ancestors, you’re essentially functioning as a combo deck. Every action you take is built in service of the final turn when you cast a Rally the Ancestors and end the game. This lets you block more aggressively against aggro decks and extend into sweepers against control decks more aggressively than you otherwise would. That said, it’s often best to make your big push to the battlefield the turn before you plan to cast Rally the Ancestors, since that push will force your opponent to react to cards you ultimately don’t care about.
To execute this plan, you need to do two things. First and most obvious is to stock your graveyard with Stitcher’s Supplier and Satyr Wayfinder. If you don’t have these cards in your opening hand, then you shouldn’t value a Rally highly and may need to mulligan to find a hand that is more cohesive. Similarly, if your mills off those cards are bad, you’ll want to pivot into another plan in the meantime.
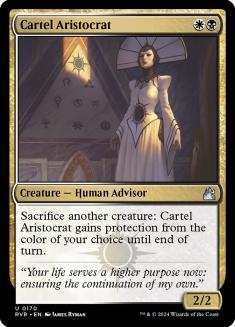
Second, you really need Cartel Aristocrat. Your creatures don’t have haste when you Rally the Ancestors them to the battlefield, so Priest of Forgotten Gods and Fiend Artisan aren’t going to get the job done. You can Rally the Ancestors on your opponent’s turn and use Priest on your upkeep with the delayed trigger from Rally on the stack, but that’s only useful if you need the extra two damage. It’s not going to win the game by itself, which is what you’re looking for.
The easiest way to get a Cartel Aristocrat is to mill it over, but if you have to cast one, it’s paramount to land it when you can protect it from exile-based removal like Baffling End or Magma Spray. That means casting it once you have an expendable creature or two on the battlefield, and not using it too aggressively and thereby opening a window for it to be answered. One of the reasons Cartel Aristocrat is so powerful is because it’s a key enabler for sacrifice decks that is very difficult to answer — don’t make the opponent’s job any easier.
In Rally the Ancestors games, Return to the Ranks can often look unnecessary, but it can play a role in a couple of different ways should you draw one. First, you can use it to stock your graveyard by returning Stitcher’s Supplier and Satyr Wayfinder. The latter can also help dig for a second white source with Rally the Ancestors, provided you have a white creature to convoke the Return.
Also, after you cast Rally the Ancestors, you have plenty of untapped creatures ready to Return any creatures you mill over. This play is often overkill but can come in handy if your first mills didn’t yield enough creatures to end the game or you’re recovering from an early Rest in Peace.
Return to the Ranks Games
Because Return to the Ranks only returns the number of creatures you can pay for, it’s often difficult for the card to put you into a commanding position on its own. That means playing towards Return to the Ranks is best against decks where your creatures can trade for theirs, or when you can use Fiend Artisan or Priest of Forgotten Gods to dominate the battlefield. Unsurprisingly, this plan is most often utilized in creature matchups, though Return to the Ranks does also help you grind through sweepers when Hunted Witness and Blisterpod can leave behind tokens to convoke.
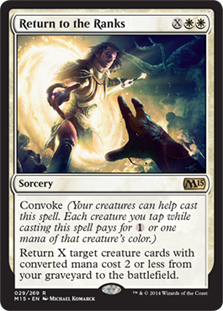
The tension in these games is in determining exactly what you need to Return to the Ranks and thus how much you can afford to trade in the early-game so you leave behind enough creatures to convoke for your desired value of X. Against aggro decks, this also means managing trading resources against your life total, which is particularly difficult against Lurrus Boros Burn, one of the most popular decks in Pioneer.
The key in striking that balance is to map out the turns until you cast Return and maximize every block you make. Chump blocking a Soul-Scar Mage on Turn 1 isn’t going to do much since your Boros Burn opponent wants to empty their hand of creatures before casting their spells, and it’s likely that you only soak up one damage. Any time you can get two or three damage from a block, you’re doing well.
The second part of executing this plan is knowing how you’re going to end the game once Return creates a substantial battlefield. There are three ways that generally happens. One is to get them low with Cartel Aristocrat and the drain life creatures, and then use Cartel Aristocrat’s protection to come across for the last points of damage. In this case, you’ll want your Hunted Witnesses and Blisterpods to supplement these to maximize your number of expendable bodies.
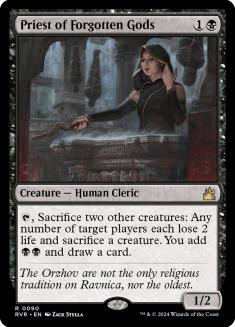
Second is to control their battlefield with Priest of Forgotten Gods. This plan works best against Lurrus Orzhov Auras and Lurrus Boros Heroic since they depend on making a small number of relatively big threats. With Priest, you don’t care much about the drain life creatures since your plan is to whittle the opponent’s battlefield to nothing, so prioritize getting extra bodies to feed to Priest and Fiend Artisan, which can find more of those cards.
The last path to victory is attacking with large Fiend Artisans. To supplement this plan, you’ll want to return your self-mill creatures so they can be as large as possible. Also, against a deck with red removal, you can consider not maxing out on X because your opponent can respond to Stitcher’s Supplier and Satyr Wayfinder triggers with removal on your Artisans when they’re temporarily smaller. Try to keep them at least a 4/4 against Lurrus Boros Burn and 5/5 against Lurrus Boros Heroic to dodge Reckless Rage.
A lot of how you kill after Return to the Ranks will depend on what you mill early on or which creatures you draw. If your path to victory post-Return doesn’t seem feasible, then you’ll want to look for a better plan.
Non-Graveyard Games
Unsurprisingly, these are the hardest games, since they involve not using your most powerful cards. Fortunately, since your other pieces are all creatures, by default you have the option of turning into an aggro deck. Doing so with a pile of 1/1s and 2/2s is far from ideal, but in the face of graveyard hate it’s sometimes necessary.
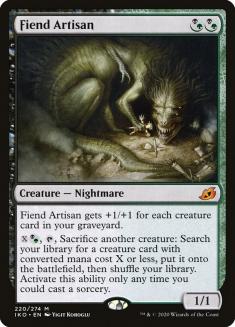
These aggro games are where Fiend Artisan shines, since it’s your only creature that can be bigger than a 2/2. Cartel Aristocrat is also good since it’s very difficult to block. These cards are going to do the bulk of your attacking, so prioritize getting them onto the battlefield early. Also, don’t be afraid to aggressively sacrifice creatures to Cartel Aristocrat to deal some damage. Those Satyr Wayfinders aren’t likely to represent more than two damage down the road.
When you want to finish off your opponent, you’ll want to find your drain life creatures and then make all-out attacks, going wide with your army of small creatures to get in both combat damage and drain triggers if your opponent blocks. It’s not always going to work, but when it does you’ll feel like a genius.
Unfortunately, going aggro isn’t foolproof against hate, since Rest in Peace stops your creatures from dying and thus triggering Zulaport Cutthroat and Cruel Celebrant, so you’ll still need to prioritize answering that card. However, this aggro plan is best in matchups when you’re bringing in lots of removal, since then you have ways to clear out blockers and get in chip-shot damage early.
The Importance of Versatility
When viewed this way, the primary strength of Abzan Rally, its versatility, becomes apparent. It can function as a control deck, combo deck, and aggro deck, making it difficult to deal with. Also, it functions worst as an aggro deck, yet looks the most like one since it has a high creature count. Traditional anti-combo and control cards are mediocre at best against the deck, and heavy removal strategies are laughable unless they pair it with graveyard hate or a timely counter/discard spell.
This kind of versatility, having multiple workable approaches to a matchup and the ability to flip between them mid-game, is a hallmark of successful decks over the last decade because it makes them difficult to attack unless you’re a fast combo deck that can safely ignore them.
The hard part is maximizing this versatility, and there isn’t a set of rules to follow to know exactly which plan to execute. The best thing you can do is be aware of everything the deck can do, keep yourself in the big-picture mindset so that you never lose the forest for the trees, and then build your intuition through practice. Over time, you’ll get a sense for when one plan is better than another, even if you can’t quite articulate why at the moment.
Also, you’ll want to go over old games and think about how other plans might have played out. Just try not to be results-oriented when you know what cards you were going to draw and which ones your opponent had.
It’s a lot of work, but Lurrus Abzan Rally is powerful enough to reward you. It’s certainly a lot more than your average sacrifice deck.